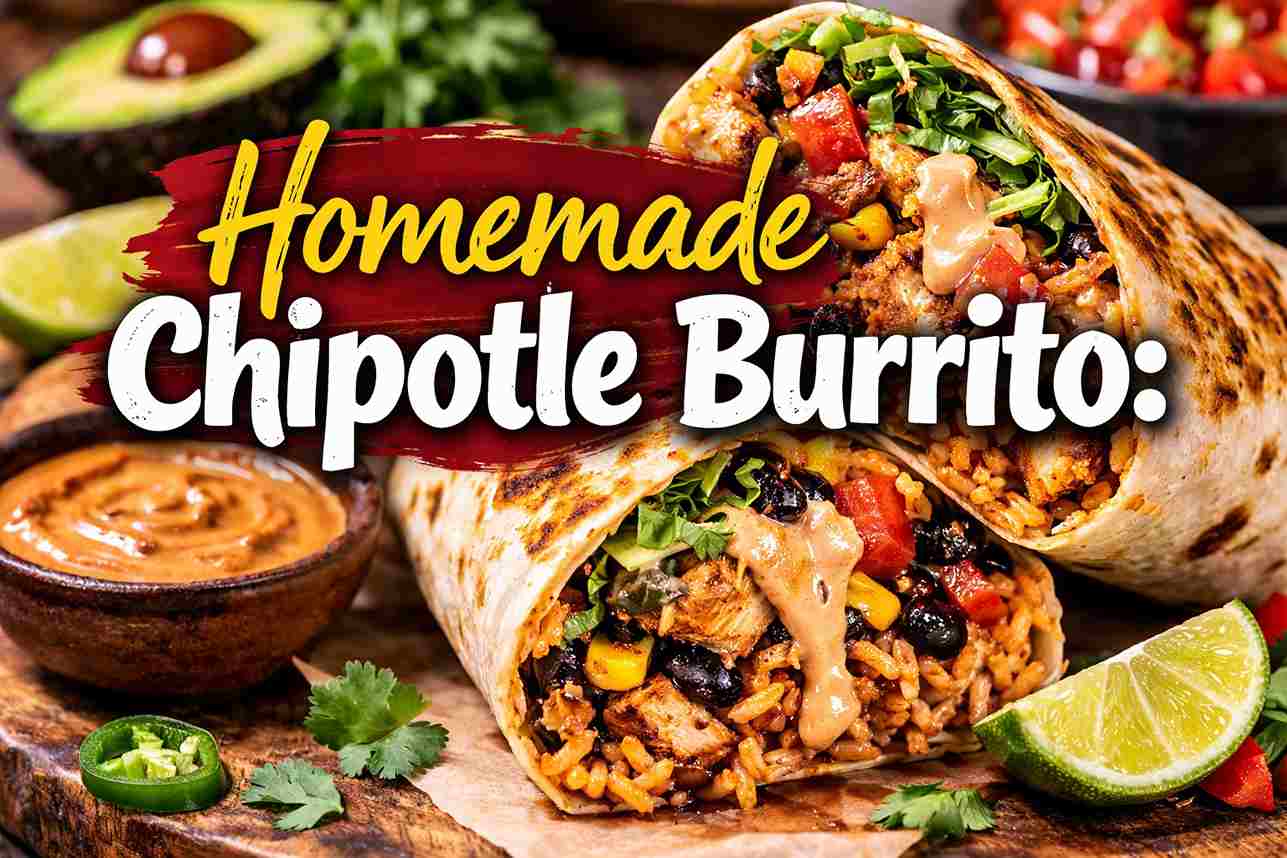
Let’s be honest — there’s something almost magical about a Homemade Chipotle burrito. The rice is never clumpy. The sour cream slides instead of globs. The tortilla wraps without tearing. And somehow, everything just works together in the most satisfying way possible. If you’ve ever stood at that assembly line thinking, “I wish I could do this at home,” then you’re in exactly the right place.
The truth is, recreating a Chipotle-quality burrito at home isn’t complicated — but it does require knowing the right techniques. This isn’t just about listing ingredients and hoping for the best. The difference between a good burrito and a great burrito comes down to a handful of very specific details: the type of rice you use, how you treat your sour cream, how thinly you shred your cheese, and even how you steam your tortilla before assembly.
In this guide, we’re going deep on every single element. Whether you’re meal-prepping for the week, hosting a burrito bar for friends, or just trying to avoid another $15 fast-casual trip, this recipe will become your go-to. We’ll walk through each component from scratch — no shortcuts, no guesswork — and by the end, you’ll be rolling burritos that honestly give the real thing a serious run for its money.
Bonus? You control every portion. Extra chicken without the extra charge? That’s entirely up to you.
| Feature | Details |
|---|---|
| Cuisine | Mexican-American (Tex-Mex) |
| Course | Main Course |
| Difficulty | Medium |
| Servings | 4 Large Burritos |
| Prep Time | 30 Minutes |
| Cook Time | 20 Minutes |
| Calories per Serving | ~850 kcal |
Why Make a Chipotle Burrito at Home?
You might be wondering — Chipotle is right around the corner. Why bother? A few very good reasons, actually.
First, there’s the cost. Four fully-loaded burritos made at home with quality ingredients will run you a fraction of what you’d spend at the restaurant, especially once you factor in the add-on charges for guacamole and extra protein. Second, there’s the control factor. You decide exactly how much of everything goes in — no skimpy portions, no sad little smear of sour cream. Third, and perhaps most importantly, you know exactly what’s in your food.
But the most underrated reason to do this at home? It’s genuinely a fun and satisfying cooking project. You’ll build real skills along the way — how to cook fluffy, non-clumping rice, how to develop deeply-flavored beans, how to properly marinate and grill chicken — skills that carry over into all kinds of other cooking. It’s one of those recipes that’s approachable enough for a weeknight but rewarding enough to feel like an achievement.
Ingredients You’ll Need
One of the best things about this recipe is that every single ingredient is available at any standard grocery store. Here’s a full breakdown of everything you need.
The Base
- 4 mega-sized flour tortillas (look for “burrito grande” on the label — size really matters here)
- 2 cups Basmati rice
- 4 cups water
- 1 large bunch of fresh cilantro
- 2 limes (you’ll use both the juice and the zest)
- Salt to taste
The Protein
- 1.5 lbs boneless, skinless chicken thighs (thighs are strongly preferred over breasts — more on this below)
- 3 chipotle peppers in adobo sauce, plus 2 tablespoons of the sauce from the can
- 3 garlic cloves, minced
- 1 tablespoon ground cumin
- 1 teaspoon smoked paprika
- 2 tablespoons olive oil
- Salt and black pepper to taste
The Beans
- 2 cans (15 oz each) pinto beans, drained and rinsed
- 2 strips of thick-cut bacon, finely chopped
- ½ small white onion, finely diced
- 2 garlic cloves
- ½ teaspoon ground cumin
- Salt to taste
The Toppings and Dairy
- 1 cup full-fat sour cream
- 4 oz block Monterey Jack cheese (not pre-shredded — this is important)
- 4 oz block Sharp Cheddar cheese (again, buy the block)
- Your favorite red salsa, store-bought or homemade
- Roasted corn and poblano salsa
- Fresh guacamole
A note on the cheese: Always buy block cheese and shred it yourself at home. Pre-shredded cheese contains anti-caking agents like cellulose powder that actively prevent proper melting. When you shred a block of cheese on the finest setting of your grater — while the cheese is still cold and firm — you get whisper-thin shreds that melt instantly from the residual heat of the other warm ingredients. No cold, rubbery cheese clumps. Just an even, silky melt throughout the entire burrito.
Step-by-Step Instructions
Step 1: Marinate and Grill the Chipotle Chicken
At least two hours before cooking — and overnight if you can plan ahead — blend your chipotle peppers in adobo, garlic, cumin, smoked paprika, olive oil, salt, and pepper into a smooth paste. Coat the chicken thighs thoroughly on all sides and refrigerate.
The chipotle peppers in adobo are the absolute heart of this flavor profile. They bring smokiness, a gentle building heat, and a deep earthy richness that is distinctly Chipotle. Don’t skip them or try to substitute with regular chili powder — they’re doing the heavy lifting here.
When you’re ready to cook, grill the chicken over medium-high heat for about 6–7 minutes per side, or until the internal temperature reaches 165°F. Once done, transfer to a cutting board and let it rest for a full 5 minutes before slicing or chopping into bite-sized pieces. Resting is non-negotiable — it allows the juices to redistribute back through the meat rather than running out the moment you cut into it.
Why chicken thighs? Thighs have more fat marbling than breasts, which means they stay juicy and tender even if they spend an extra minute on the grill. They also absorb marinade far more deeply. Chicken breasts are leaner and significantly more prone to drying out, especially in an acidic marinade. If you use breasts, be particularly careful not to overcook them.
Step 2: Cook the “Flowy” Cilantro Lime Rice
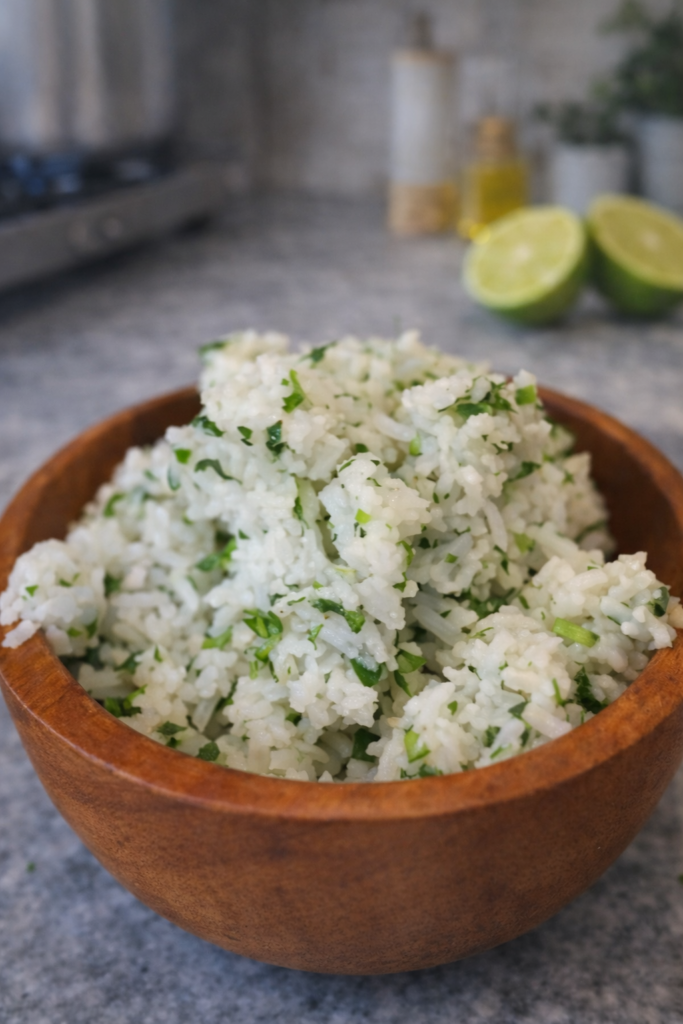
The hallmark of Chipotle’s rice is that it never clumps. Every grain stays distinct and loose, which is what gives it that signature texture people always talk about. The secret to replicating this at home is using Basmati rice. Unlike regular long-grain white rice, Basmati has a naturally drier, more elongated grain structure that keeps individual grains separated during and after cooking.
Use a 2:1 water-to-rice ratio. Bring the water to a boil, add a generous pinch of salt, then add the rice. Reduce to a low simmer, cover tightly, and cook for 15 minutes. Do not lift the lid while it’s cooking — that trapped steam is doing critical work.
Once the 15 minutes are up, here comes the most important move: immediately transfer the cooked rice into a large, wide bowl rather than leaving it to sit in the pot. Spreading the rice out over a wider surface area allows excess steam to escape quickly, which stops the cooking process and prevents the gummy, overcooked texture you’re trying to avoid.
While the rice is still warm (not steaming hot, but warm to the touch), gently fold in a generous amount of freshly chopped cilantro and the juice and zest of about one and a half limes. Use a folding motion rather than stirring — you want to keep those grains separate and intact. Taste and adjust salt. The finished rice should taste bright, citrusy, and herbaceous.
Step 3: Simmer the Bacon Pinto Beans
In a small saucepan over medium heat, render your finely chopped bacon until it’s crispy and the fat has released into the pan. Don’t drain that fat — it’s your flavor foundation for everything that follows.
Add the diced white onion and cook until soft and translucent, about 4 minutes. Add the garlic and cumin and stir for another 30 seconds until fragrant. Then add your drained pinto beans along with a small splash of water — about a quarter cup — and stir everything together. Reduce to a low simmer and cook for 8–10 minutes.
As they cook, use the back of a spoon to mash a few of the beans against the side of the pot. This releases some of their starch and creates a slightly creamy, cohesive texture while the majority of beans remain whole. Season generously with salt. These beans are deeply savory with a smoky backbone from the bacon — a world away from plain, unseasoned canned beans.
Step 4: Whip the Sour Cream and Prep the Cheese
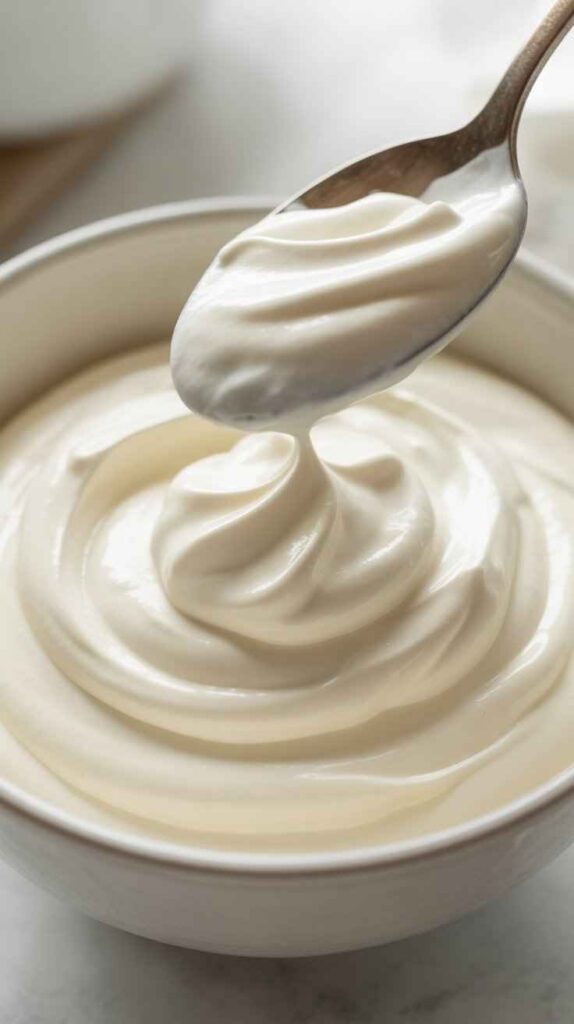
This step sounds minor, and a lot of home cooks skip it. That’s a mistake.
Standard sour cream straight from the container is dense and heavy. It drops onto your burrito in a thick, cold glob and doesn’t distribute evenly across the other ingredients. Chipotle’s sour cream behaves completely differently — it’s light, airy, and almost pourable, which means it coats every layer of the filling rather than just sitting in one spot.
To replicate this at home, add your sour cream to a bowl and whisk it vigorously by hand for about 60 to 90 seconds, or use a hand mixer on medium speed for 30 seconds. You’ll see and feel a clear difference — the sour cream will become noticeably fluffier, lighter, and more spreadable. This is simply air being incorporated, and it genuinely transforms the eating experience.
For the cheese, pull your blocks of Monterey Jack and Sharp Cheddar directly from the refrigerator — cold cheese always shreds better than room-temperature cheese — and grate both on the finest setting of a box grater. The resulting shreds are almost feather-light and will melt instantly from the residual heat of the warm chicken, rice, and beans inside the burrito.
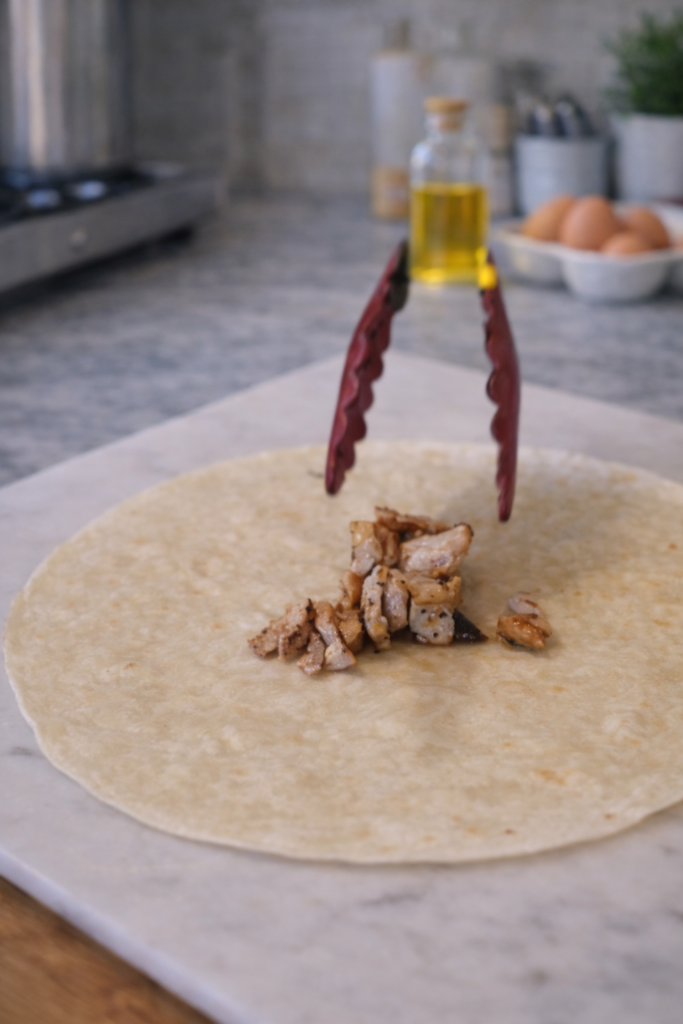
Step 5: Steam the Tortilla
This is the single most overlooked step in homemade burrito-making, and it causes more burrito failures than anything else. A cold flour tortilla is rigid and brittle. The moment you try to roll it around a generously filled burrito, it cracks along the fold lines and your entire burrito falls apart.
The fix takes less than a minute. Fold your large flour tortilla in half, wrap it loosely in a paper towel that has been dampened with a little water, and microwave it for 25 to 30 seconds. The moisture in the paper towel turns to steam inside the microwave, and that steam penetrates the tortilla and makes it incredibly pliable — almost silk-like in how it moves and stretches.
Work quickly after it comes out of the microwave. A steamed tortilla cools and stiffens within a couple of minutes, so have all your fillings already measured out and ready to go before you start assembly. Preparation is everything at this stage.
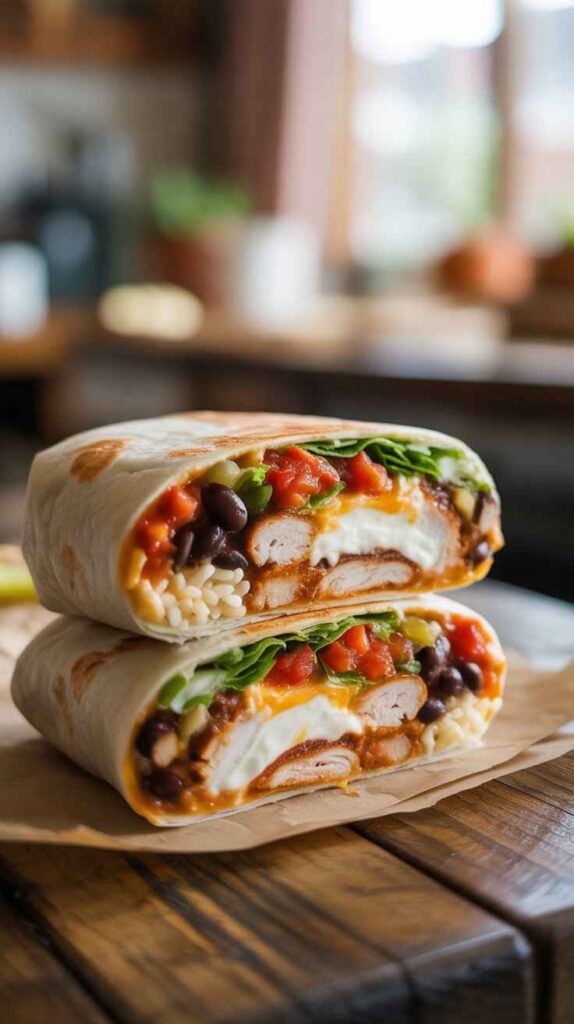
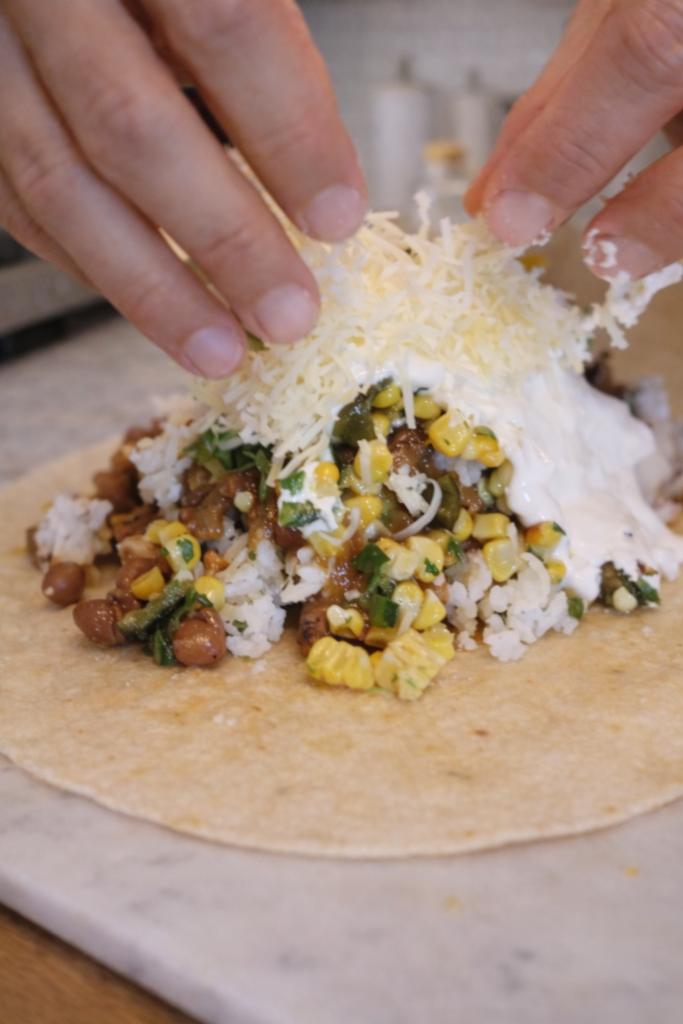
Step 6: Layer and Assemble
Lay your steamed tortilla flat on a clean work surface. Position your fillings in the lower-center third of the tortilla, leaving at least a two-inch border on all sides. This border is what gives you room to fold without the filling escaping out the ends.
The layering order matters. Start with the chicken as your base — it anchors everything above it. Add a moderate scoop of cilantro lime rice next. Be intentional with your rice portion — the tortilla is already a significant source of carbohydrates, so there’s no need to overload it. Follow with a generous spoonful of bacon pinto beans, then both salsas, then the whipped sour cream, and finally finish with the thin-shredded cheese on top.
To fold: lift the bottom edge of the tortilla up and over the filling, pressing down firmly to compact everything together. Fold the left and right sides inward over the filling. Then roll forward from the bottom, using your fingers and palms to keep the filling tight and compact as you roll. The goal is a firm, cylindrical burrito that holds its shape with nothing escaping from the ends.
Step 7: The Final Oven Finish
This step is optional, but it’s highly recommended. Place your rolled burrito seam-side down on a baking sheet and put it into an oven preheated to 375°F for 5 to 7 minutes. The dry oven heat does two great things simultaneously: it gives the exterior of the tortilla a very light toast for a pleasant textural contrast, and it allows all the ingredients inside — especially the cheese — to meld together into one cohesive, harmonious filling.
Alternatively, you can set the burrito seam-side down in a dry skillet or griddle over medium heat and press it gently for about 90 seconds per side. Both methods work. The oven is more forgiving and produces a more even result.
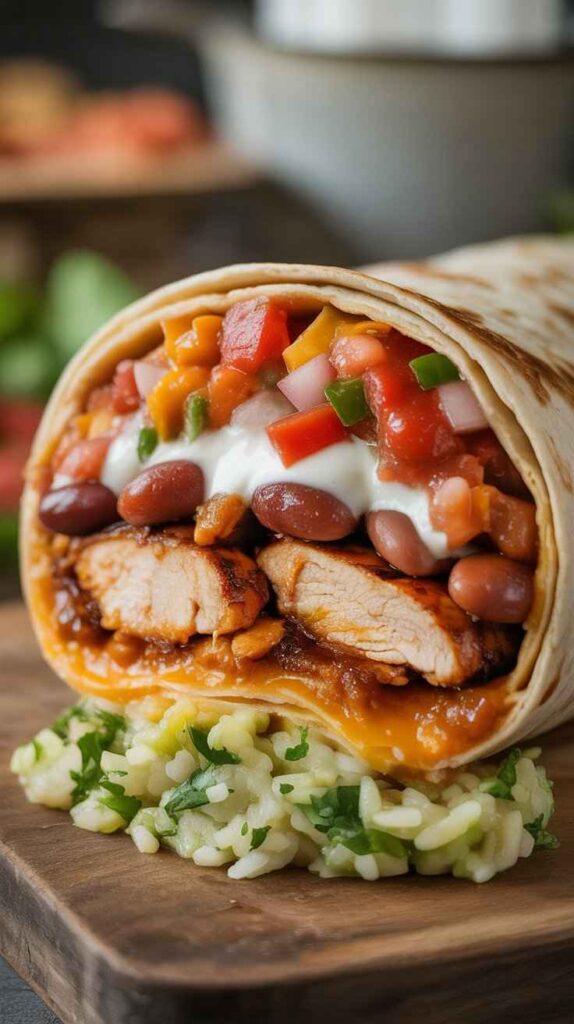
Chipotle-Style Chicken Burrito
Smoky chipotle chicken, cilantro lime rice, bacon pinto beans & whipped sour cream — restaurant-quality at home
- 1.5 lbs chicken thighs (boneless, skinless)
- 3 chipotle peppers + 2 tbsp adobo sauce
- 3 garlic cloves, minced
- 1 tbsp cumin, 1 tsp smoked paprika
- 2 tbsp olive oil, salt & pepper
- 2 cups Basmati rice + 4 cups water
- 1 bunch fresh cilantro, chopped
- 2 limes (juice + zest), salt
- 2 cans (15 oz) pinto beans
- 2 strips thick-cut bacon, chopped
- ½ white onion, diced + 2 garlic cloves
- ½ tsp cumin, salt
- 4 mega flour tortillas (burrito grande)
- 1 cup full-fat sour cream
- 4 oz Monterey Jack + 4 oz Sharp Cheddar*
- Red salsa, corn & poblano salsa, guac
*Always buy block cheese — shred on finest setting while cold. Pre-shredded won’t melt properly.
Marinate & Grill Chicken
Blend chipotles, adobo, garlic, cumin, paprika, oil, salt & pepper into paste. Coat chicken thighs, marinate 2+ hrs (overnight best). Grill 6–7 min per side to 165°F internal. Rest 5 min before chopping. Thighs > breasts — more fat = juicier, better marinade absorption.
Cook Cilantro Lime Rice
Basmati rice (2:1 water ratio) is key — stays fluffy, never clumps. Boil, reduce to low simmer, cover 15 min. DON’T lift lid. Transfer immediately to wide bowl (stops cooking, releases steam). Fold in chopped cilantro + juice/zest of 1½ limes while warm. Salt to taste.
Simmer Bacon Pinto Beans
Render chopped bacon until crispy — don’t drain fat. Add diced onion (4 min), garlic & cumin (30 sec). Add drained beans + ¼ cup water. Simmer 8–10 min. Mash a few beans against pot for creamy texture while rest stay whole. Season generously.
Whip the Sour Cream
This matters! Whisk sour cream vigorously 60–90 sec (or hand mixer 30 sec). It becomes lighter, fluffier, almost pourable — spreads evenly instead of cold globs. Grate cold block cheese on finest setting — feather-light shreds melt instantly.
Steam the Tortilla
CRITICAL: Cold tortillas crack and fail. Fold tortilla in half, wrap in damp paper towel, microwave 25–30 sec. Steam makes it silk-like and pliable. Work quickly — it stiffens within 2 min. Have all fillings ready before steaming.
Layer & Assemble
Place fillings in lower-center third, leave 2″ border all sides. Layer order: chicken (base) → rice (moderate portion) → beans → salsas → whipped sour cream → cheese on top. Lift bottom edge over filling, fold sides in, roll forward tightly.
Optional: Oven Finish
Place seam-side down on baking sheet, 375°F for 5–7 min. Gives light toast to exterior + melts cheese throughout. Alternative: dry skillet, 90 sec per side with gentle pressure. Both create cohesive, melded filling.
Approximate Nutritional Information (Per Burrito)
| Nutrient | Amount |
|---|---|
| Calories | ~850 kcal |
| Protein | ~52g |
| Total Carbohydrates | ~78g |
| Dietary Fiber | ~10g |
| Total Fat | ~32g |
| Saturated Fat | ~12g |
| Sodium | ~1,200mg |
Note: Values are estimates and will vary based on exact ingredient brands, portion sizes, and any customizations.
Storage, Reheating, and Meal Prep Tips
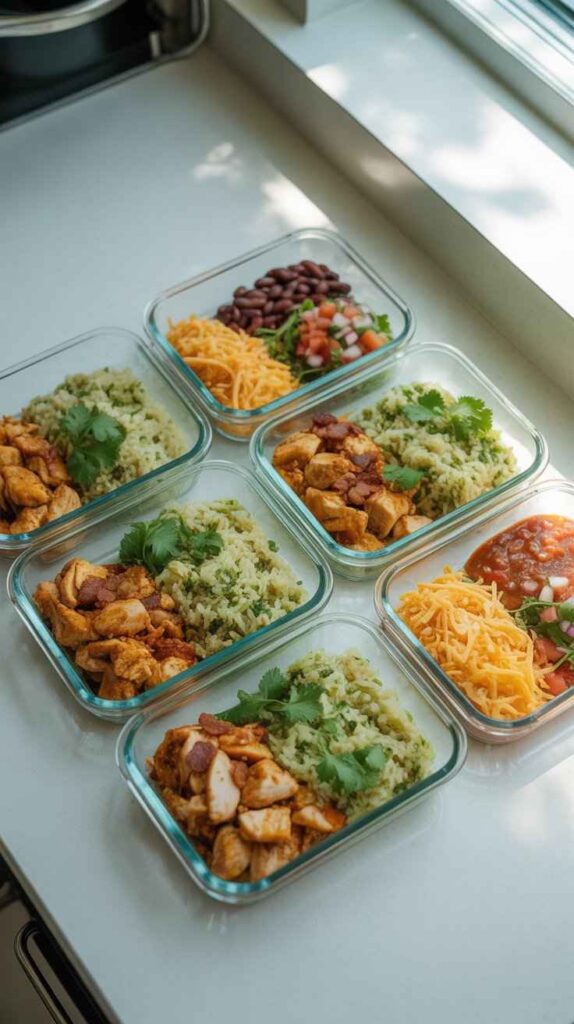
This recipe is excellent for meal prep, and the components hold up beautifully in the fridge. The most flexible approach is to prepare all the individual components — chicken, rice, beans, and salsas — and store them separately in airtight containers for up to 4 days. Assemble burritos fresh to order whenever you’re ready to eat. This way your tortillas stay crisp and dry rather than absorbing moisture and going soggy.
If you do want to assemble in advance, wrap each burrito tightly in aluminum foil and refrigerate for up to 3 days. To reheat, place the foil-wrapped burrito directly into a 350°F oven for 15 to 18 minutes. This reheats evenly all the way through without making the tortilla rubbery. You can also microwave it unwrapped for 2 to 3 minutes, flipping halfway through, though the oven method produces a noticeably better result.
For longer-term storage, these burritos freeze well. Wrap each one in plastic wrap first, then a layer of foil, and freeze for up to 2 months. Thaw overnight in the refrigerator before reheating.
Variations and Customizations
One of the best things about making this at home is how easily you can adapt it to different dietary preferences and flavor preferences.
Vegetarian version: Skip the chicken entirely and double the beans. Add a batch of sautéed fajita vegetables — bell peppers, white onion, and zucchini seasoned with cumin, chili powder, and a little garlic — for extra substance and texture.
Vegan version: Build on the vegetarian version above, replace the whipped sour cream with whipped cashew cream, and use a good dairy-free shredded cheese alternative. The rest of the recipe is naturally vegan.
Steak version: Marinate thinly sliced flank steak in the same chipotle adobo marinade and cook it in a very hot cast-iron skillet or on a grill for a proper sear. Always slice flank steak against the grain for the most tender result.
Low-carb version: Skip the rice and load up on extra protein and fajita vegetables. Use a low-carb or whole wheat tortilla, or skip the tortilla entirely and serve everything as a burrito bowl over cauliflower rice.
Extra spicy: Add a spoonful of hot salsa verde alongside the red salsa, a few fresh jalapeño slices, or a drizzle of your favorite hot sauce during assembly.
Frequently Asked Questions about Homemmade Chipotle Burrito
What type of rice does Chipotle use?
Chipotle uses long-grain white rice, and the closest match you’ll find at the grocery store is Basmati rice. The defining characteristic of their rice is that it’s non-clumping, light, and fluffy. Basmati naturally has a longer, drier grain that achieves this texture more reliably than standard white rice. The cilantro and lime are always added after cooking, while the rice is still warm, so the flavors absorb properly without making the rice wet or sticky.
Why does Chipotle’s sour cream look different from regular sour cream?
Chipotle aerates their sour cream before serving, which gives it a lighter, more liquid consistency compared to sour cream straight from a container. At home, you can replicate this by whisking your sour cream vigorously for about 60 to 90 seconds by hand, or using a hand mixer on medium speed for 30 seconds. The difference is immediate and noticeable — the sour cream becomes fluffier, lighter, and far easier to spread evenly across your burrito filling.
Can I use chicken breast instead of chicken thighs?
You can, but thighs are strongly recommended. They have significantly more fat marbling, which keeps them moist and juicy even through a long marinade and high-heat cooking. They also absorb the chipotle adobo flavor more deeply. Chicken breasts are leaner and dry out much more quickly, especially when marinated in an acidic mixture. If you use breasts, watch the internal temperature carefully and pull them off the heat the moment they hit 165°F.
How do I stop my burrito from falling apart when I roll it?
The single most important step is steaming the tortilla before assembly. A cold, stiff tortilla cracks and tears when you try to roll it around a full load of fillings. Beyond that, avoid overfilling — leave a two-inch border on all sides of the tortilla and resist the urge to pile in more than will fit. Use a firm, deliberate folding and rolling motion, pressing the filling tight as you go rather than just wrapping loosely.
Can I make this recipe ahead of time for meal prep?
Absolutely, and it’s one of the best recipes for it. Prepare all the components separately and store them in individual airtight containers in the fridge for up to four days. Assemble burritos fresh whenever you’re ready to eat. If you prefer to assemble in advance, wrap each burrito tightly in aluminum foil and refrigerate for up to three days, or freeze for up to two months.
What’s the best way to reheat a pre-made burrito?
The oven produces the best results. Place your foil-wrapped burrito in a 350°F oven for 15 to 18 minutes. This heats the burrito evenly from outside to center without making the tortilla soggy or chewy. If you’re short on time, the microwave works — unwrap the burrito, place it on a microwave-safe plate, and heat for 2 to 3 minutes, turning it over halfway through. For a crispier exterior, finish it in a dry skillet over medium heat for a minute or two on each side.
Is this recipe gluten-free?
All of the fillings — the chicken, rice, beans, salsas, and dairy — are naturally gluten-free. The standard large flour tortilla, however, is not. To make the entire recipe gluten-free, substitute a certified gluten-free large flour tortilla or use two overlapping corn tortillas as a base. Since corn tortillas are smaller and less pliable, you might find it easier to serve the fillings as a burrito bowl instead.
Can I cook the chicken in an oven or air fryer instead of grilling?
Yes, both are great alternatives. For the oven, bake the marinated chicken thighs at 425°F for 22 to 25 minutes, flipping once halfway through. For the air fryer, cook at 400°F for 16 to 18 minutes, also flipping once. In both cases, make sure the internal temperature reaches 165°F before pulling. For a char similar to grilled chicken, finish the oven-baked thighs under the broiler for 2 to 3 minutes at the end — this caramelizes the exterior and gives you that slightly blackened, smoky edge that’s very characteristic of Chipotle’s chicken.
Final Thoughts
Making a Chipotle-quality burrito at home is really all about respecting the small details that most people overlook. The right variety of rice. The aerated sour cream. The cold-shredded cheese. The steamed tortilla. None of these steps are difficult or time-consuming on their own — but together, they’re the difference between a basic homemade wrap and something that genuinely rivals what you’d get from the restaurant.
Once you have all your components ready, assembly takes less than five minutes. And the result? A fresh, beautifully proportioned burrito made exactly the way you want it, with as much chicken as your heart desires — no upcharges required. Get your ingredients together, steam those tortillas, and get rolling.
Browse Every Recipe
The Complete Recipe Collection
From comforting weeknight dinners to elegant cocktails — every recipe from Relish the Recipe, all in one place.
- Beef Bourguignon
- Steak au Poivre
- Perfect Filet Mignon
- Grilled Coffee-Cola Skirt Steak
- Grilled Mojo Beef
- Vietnamese Lemongrass Chicken
- Honey Balsamic Pomegranate Glazed Chicken
- Mushroom Stuffed Chicken Breast
- Zesty Herb Marinated Grilled Chicken Thighs
- Baked French Onion Chicken
- One-Pan Tuscan Orzo with Chicken
- Creamy Peri Peri Chicken Pasta
- One-Pan Chicken Chorizo Orzo
- Jamaican Jerk Chicken & Plantain Skillet
- Pan Seared Pork Tenderloin in Peppercorn Gravy
- Citrus Glazed Roasted Pork Ribs
- Smothered Pork Chops with Mushroom Gravy
- Teriyaki Pork Noodles
- One-Pan Chorizo Rice Skillet
- Greek Lemon Roast Lamb & Potatoes
- Greek Lamb with Orzo
- Classic Greek Beef Stifado
- Sausage Ragù
- Italian Sausage & Lamb Ragù
- Sausage & Pepper Bolognese
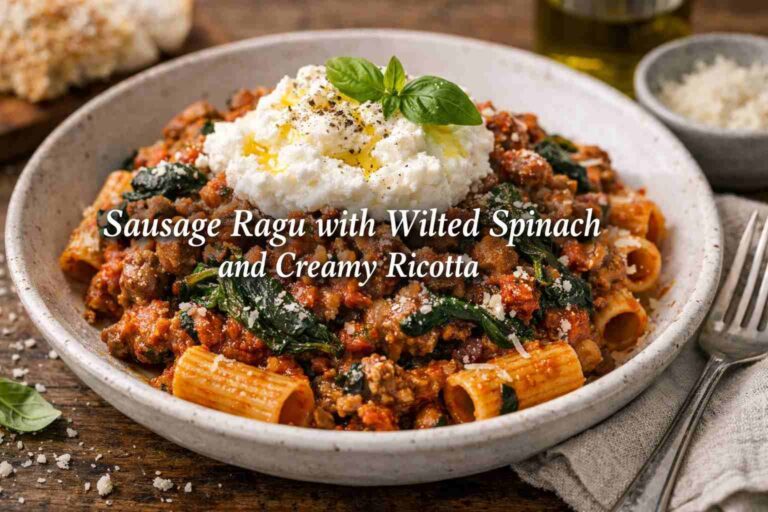
- Sausage Ragù with Spinach & Ricotta
- Sausage & Zucchini Rigatoni
- 3 Italian-Style Meatloaves
- Brown Butter & Sage Mezzi Rigatoni
- Red Pesto Gnocchi
- Creamy Chicken Meatball Orzo
- Creamy French Onion Orzo Casserole
- Quick Vegan Lasagna
- Vegan Ramen
- Spicy Maple Tofu Rice Bowl
- Oven-Baked Potatoes with Meatballs & Cheese
- Oven-Roasted Crispy Potatoes
- Crispy Potato Tacos
- Korean Sweet & Spicy Beef Meatballs
- Lean Jalapeño Beef Burger
- Vegan Bulgogi Pinwheels
- Vegan Cabbage Rolls
- Creamy Broccoli & Garlic Soup
- New England Creamy Clam Chowder
- Manhattan Clam Chowder
- Split Pea Soup
- Ham & Bean Soup
- Hearty Vegetable Barley Soup
- Creamy Asparagus Soup
- French Cream of Chestnut Soup
- Classic Provençal Fish Soup
- Carnival Squash Soup with Turmeric
- Vegan Chicken & Dumpling Soup
- 30-Minute Creamy Shrimp Alfredo
- Crispy Buffalo Chicken Wonton Cups
- Buffalo Chicken Cauliflower Dip
- Buffalo Chicken Garlic Bread
- Crispy Garlic Parmesan Wings
- Garlic Butter Cheese Bombs
- Quick Ham & Cheese Pinwheels
- Philly Cheesesteak Stuffed Rolls
- Bacon Cheeseburger Dip
- Pepperoni Pizza Dip
- Brown Sugar Bacon-Wrapped Smokies
- Chili Crisp Egg Avocado Toast
- Crispy Rice Cake Benedict
- Savory Chicken Salad Cucumber Rolls
- Cabbage & Lentil Rolls
- Shrimp Bruschetta
- Honey Butter Cornbread
- Spinach & Onion Savory Jam
- Ultimate Big Mac Salad
- Chicken & Potato Croquettes
- High-Protein Lentil Crackers
- Blueberry Tiramisu
- Kunafa Tiramisu
- Lighter Eggnog Tiramisu
- Mirror Glaze Raspberry Mousse Cake
- Ombré Heart Buttercream Cake
- Valentine’s Day Mini Cakes
- Molten Mini Chocolate Lava Cakes
- High-Protein Pumpkin Mousse
- No-Bake Oreo Delight
- No-Bake Pistachio Cheesecake
- No-Bake Banana Pudding
- Samoa Brownies
- Cream Cookie Chunk Fudge
- Thin & Chewy Chocolate Chip Cookies
- Red Velvet Cookies
- Valentine Heart Cookies
- Strawberry Cheesecake Tacos
- Healthy Oatmeal Apple Banana Cake
- Sugar-Free Oat Cakes
- Sugar-Free Banana Oat Brownies
- Coconut Cove Baked Oatmeal
- Blueberry Apple Morning Oats Cake
- Sugar-Free Dates, Banana & Chocolate
- Low-Carb Cottage Cheese Ice Cream
- Keto Schnitzel
- Keto Beef Roulades
- Fluffy Keto Cloud Bread
- Keto Muffins
- Keto German Chocolate Cake
- Keto Yogurt Almond Cake
- Keto Spinach & Feta Omelette
- Keto Bacon Cheeseburger Casserole
- Keto Eggplant Parmesan
- 15-Min Keto Creamy Garlic Chicken
- Low-Carb Tuscan Chicken Bake
- One-Pot Zoodle Alfredo
- Keto Garlic & Herb Breadsticks
- Keto Chocolate Chip Banana Bread
- Keto Tortillas
- 3-Ingredient Carnivore Bun
- Mediterranean Stuffed Roasted Peppers
- Red Lentil Bread
- Classic Whiskey Sour
- Old Fashioned
- Manhattan
- Hot Apple Whisky Lime
- Classic Margarita
- Frozen Strawberry Margarita
- Strawberry Coconut Margarita
- Mango Chilli Margarita
- Paloma
- Aperol Spritz
- Moscow Mule
- Strawberry Basil Mule
- Vodka Cranberry
- 3 Ways: Blueberry Vodka Lemonade
- Homemade Piña Colada
- Mermaid Mimosa
- Passion Fruit Martini
- Honolulu Highball
- Angel Face
- Mandarin Sunrise
- Pomegranate Gimlet
- Southside Gin Cocktail
- Paper Plane
- White Lady
- Almond Joy Cocktail
- Green Tea Shot
- Black Grapes Mojito
- 10 Best Rum Cocktails