
If you are searching for a show-stopping holiday dessert that requires zero oven time and comes together in under 30 minutes, you have landed in the right place. This Lighter Eggnog Tiramisu is a festive, seasonal spin on the beloved Italian classic — and it is about to become your new holiday tradition.
Classic tiramisu leans on heavy mascarpone, raw egg yolks, and generous amounts of cream. This lighter version swaps those rich components for a silky eggnog custard thickened with cornstarch, paired with a fluffy whipped topping. The result? All the luxurious, melt-in-your-mouth flavor of traditional tiramisu, but with a fraction of the calories and none of the guilt.
Whether you are hosting a holiday dinner party, bringing a dessert to a Christmas potluck, or simply craving something festive and indulgent on a cozy winter evening, this recipe checks every box. It is easy, elegant, make-ahead friendly, and bursting with the warm spiced flavors of the holiday season. Let’s dive in.
Recipe Details
| Detail | Information |
|---|---|
| Cuisine | Italian-American Fusion |
| Course | Dessert |
| Difficulty | Easy |
| Servings | 9–12 Servings |
| Prep Time | 20 Minutes |
| Cook Time | 7 Minutes (plus 4 hours chilling) |
| Calories per Serving | Approx. 185 kcal |
Ingredients
- 1 cup brewed coffee — freshly made and cooled to room temperature
- 3 cups eggnog — divided (¼ cup for the slurry, 2¾ cups for the base)
- ¼ cup cornstarch — the key to a perfectly thick, creamy custard
- 24 ladyfingers — the classic sponge biscuit that forms the base of every great tiramisu
- 1 cup light whipped topping — CocoWhip, Truwhip, or any light whipped cream you prefer
- Ground cinnamon — optional, for dusting just before serving
Step-by-Step Instructions

Step 1: Prepare the Coffee Soak
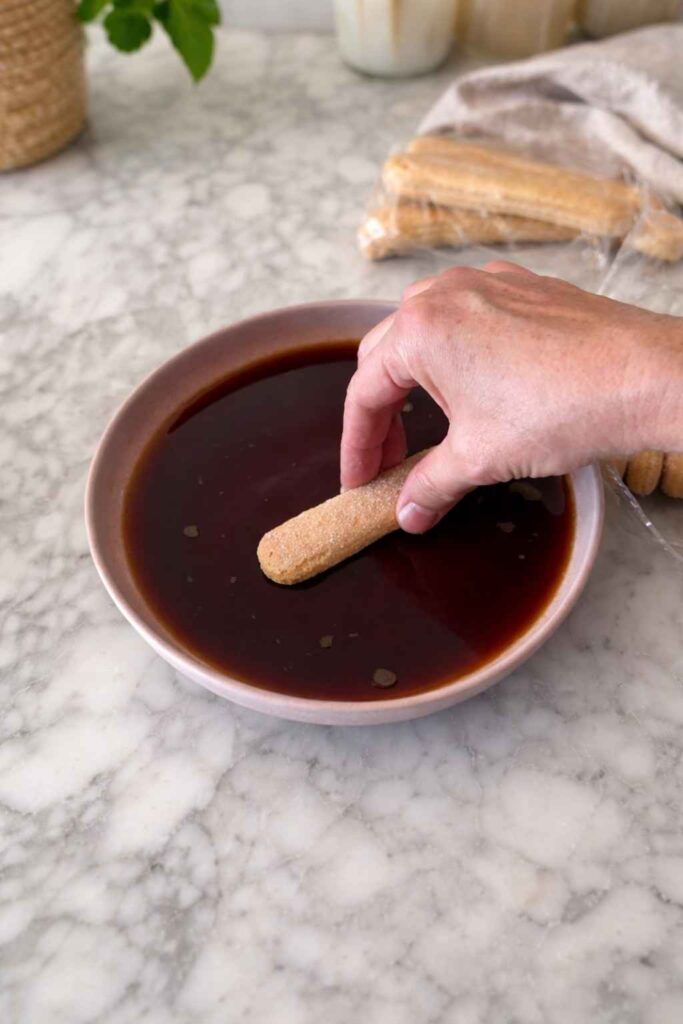
Brew one cup of strong coffee and pour it into a shallow bowl wide enough to dip your ladyfingers. Set it aside and allow it to cool completely to room temperature. This step is non-negotiable — dipping ladyfingers in hot coffee will cause them to fall apart instantly, and you will lose the lovely layered structure that makes tiramisu so visually impressive.
Step 2: Make the Eggnog Custard
This is the heart of the recipe. Start by making a cornstarch slurry: in a small bowl, whisk together ¼ cup of cornstarch with ¼ cup of eggnog until the mixture is completely smooth with no lumps. This technique prevents the cornstarch from clumping when it hits the warm liquid.
Next, pour the remaining 2¾ cups of eggnog into a medium saucepan over medium heat. Whisk in the cornstarch slurry and stir continuously for 5 to 7 minutes. You will notice the mixture thickening gradually. As soon as it reaches a thick, custard-like consistency — but before it comes to a full boil — remove it from the heat.
The most important tip: Allow this custard to cool completely before you begin assembling. If you rush this step and assemble with warm custard, it will soak into the ladyfingers too quickly and turn your beautiful layers into a soggy mess. Speed up the cooling process by placing the pan in the fridge for 20–30 minutes.
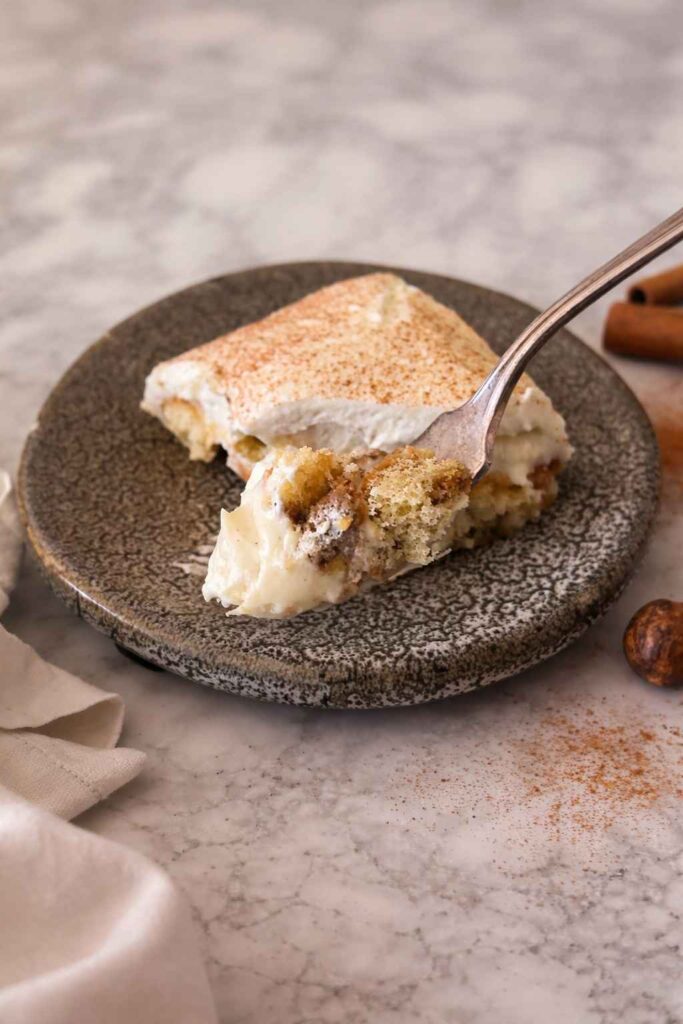
Step 3: Build the First Layer
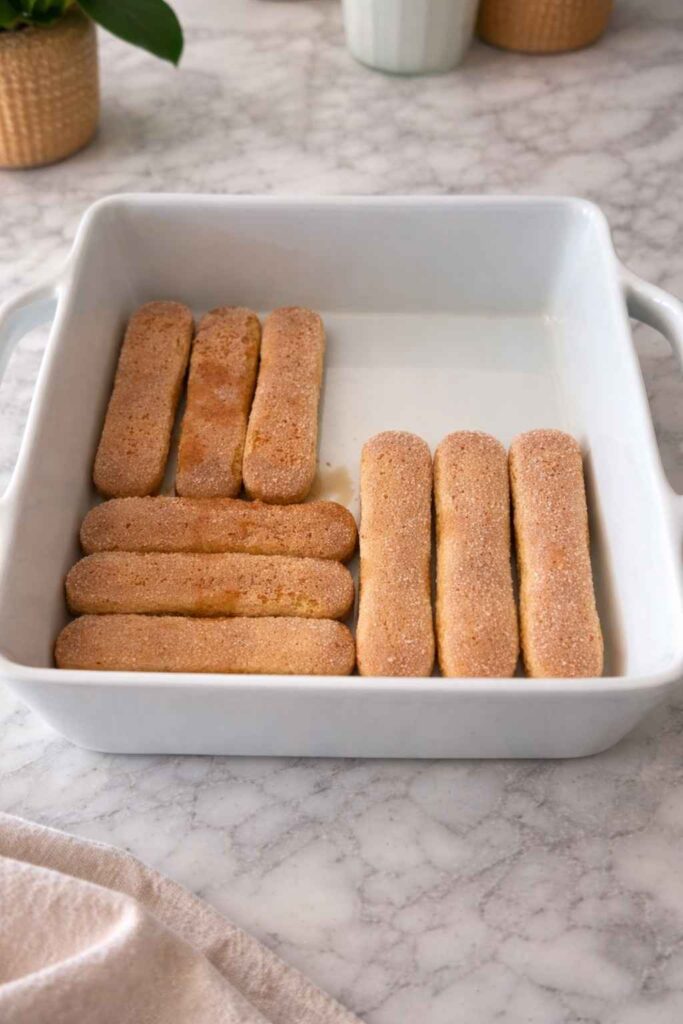
Once everything is cool, it is time to assemble. Take 12 ladyfingers and dip each one individually into the cooled coffee. Hold each biscuit in the liquid for just 1 to 2 seconds per side — no longer. You want the ladyfingers to absorb just enough coffee to be moist and flavorful without becoming completely saturated.
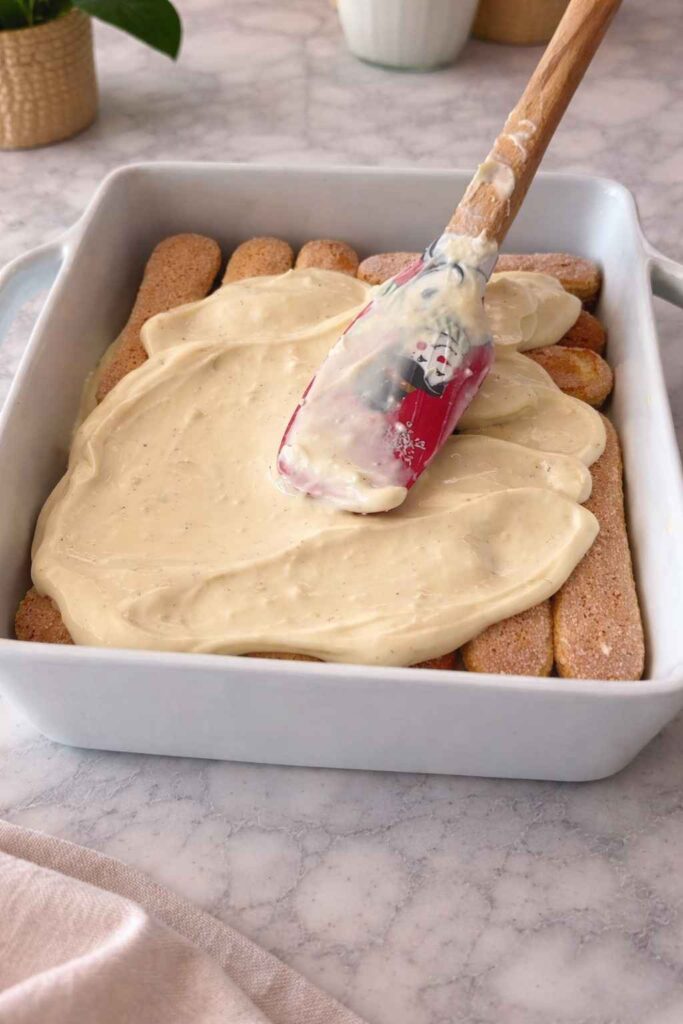
Arrange the soaked ladyfingers in a single, snug layer across the bottom of a 9×9 inch baking dish. Then, spread exactly half of your cooled eggnog custard evenly over the top of this first layer using a spatula.
Step 4: Repeat the Layers
Repeat the process with the remaining 12 ladyfingers — dip, layer, and top with the rest of the eggnog custard. Spread the custard into an even, smooth layer. At this point, your tiramisu is already looking stunning.
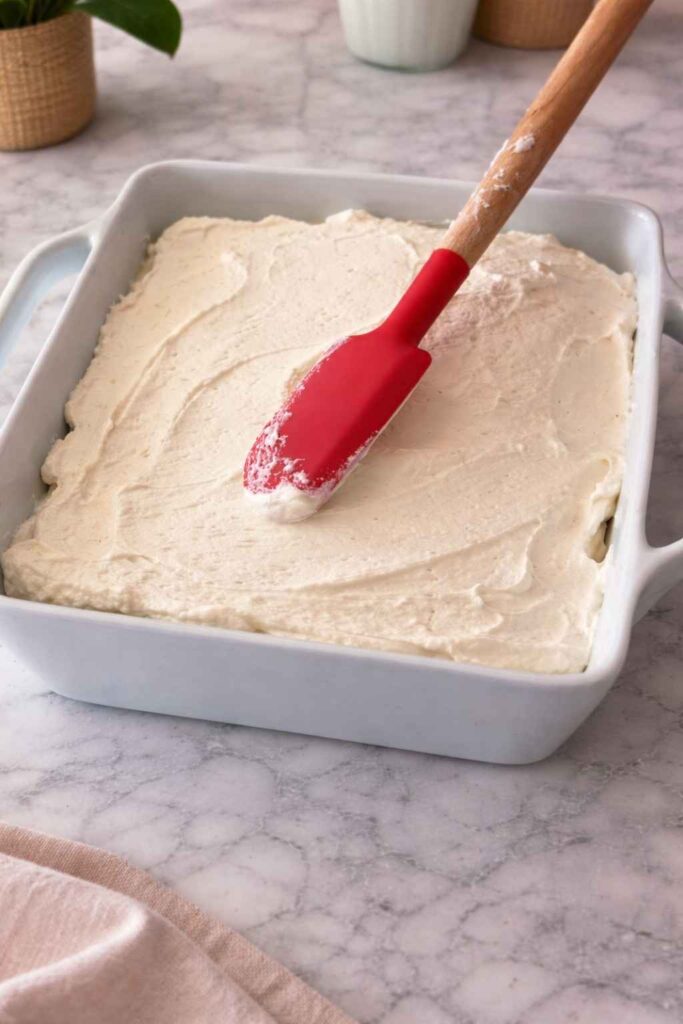
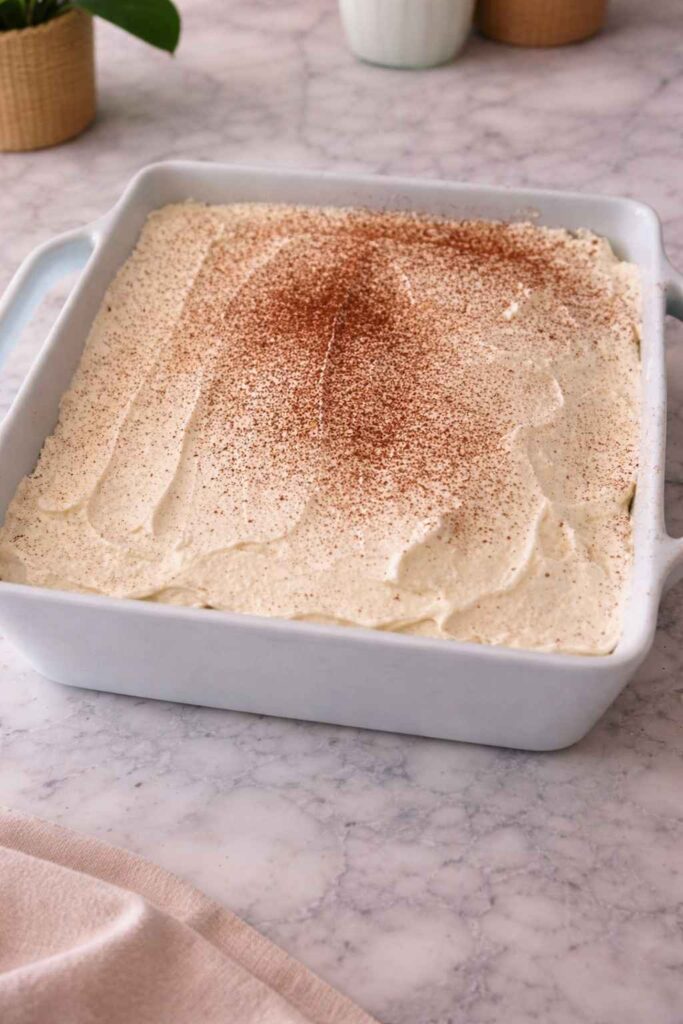
Step 5: Add the Whipped Topping and Chill
Spread 1 cup of light whipped topping evenly across the top of the custard layer. Cover the dish tightly with plastic wrap or an airtight lid and refrigerate for a minimum of 4 hours. Overnight chilling is even better. This resting time is what transforms the dish entirely — the ladyfingers soften into a cake-like texture, and the eggnog custard sets into something wonderfully creamy and sliceable.
Step 6: Garnish and Serve
When you are ready to serve, remove the tiramisu from the refrigerator and dust the top generously with ground cinnamon. Cut into squares and serve chilled. Watch it disappear from the table in minutes.
Tips for the Best Results
Use full-fat eggnog for a richer custard. While this recipe is already lighter than the traditional version, using regular eggnog (not fat-free) gives you the best flavor and the silkiest texture.
Do not over-soak your ladyfingers. The 1-to-2-second rule is there for a reason. Over-soaked ladyfingers will disintegrate during layering and turn the dessert mushy.
Make it ahead of time. This tiramisu tastes significantly better after an overnight rest in the refrigerator. The flavors deepen, the texture improves, and it becomes much easier to slice cleanly. It is the ideal make-ahead dessert for stress-free holiday entertaining.
Add a boozy twist. For an adult version, stir 2 tablespoons of rum, bourbon, or coffee liqueur into your coffee soak. It pairs beautifully with the eggnog flavor.
Spice it up. A light dusting of nutmeg alongside the cinnamon takes the holiday flavors to a whole new level.
Why You’ll Love This Recipe
There are hundreds of holiday dessert recipes out there, but this one stands apart for a few key reasons:
It is a no-bake recipe. During the holidays, oven real estate is priceless. Whether you are roasting a turkey, baking rolls, or warming side dishes, the last thing you need is a dessert competing for oven space. This tiramisu is assembled entirely on your countertop and chilled in the fridge.
It is genuinely lighter. By replacing mascarpone and heavy cream with a cornstarch-thickened eggnog custard and light whipped topping, each serving comes in at around 185 calories. That is roughly half the calories of a traditional tiramisu serving, leaving you plenty of room for seconds.
It is impressive without being complicated. The layered presentation looks like something you would order at a high-end restaurant, but the actual technique is completely beginner-friendly. If you can stir a pot and dip a biscuit, you can make this recipe.
It captures the holidays in every bite. The combination of bold coffee, sweet creamy eggnog, and the warm spice of cinnamon is essentially the flavor of December. Every forkful tastes like the holidays.
Frequently Asked Questions
Can I make this tiramisu dairy-free? Yes! Use a dairy-free eggnog (available at most grocery stores during the holiday season) and a dairy-free whipped topping like CocoWhip. The result is just as delicious.
How long does it keep in the fridge? Stored covered, this tiramisu will keep well in the refrigerator for up to 3 days. The texture actually continues to improve through day two.
Can I freeze it? Freezing is not recommended, as the whipped topping and custard can separate and become grainy when thawed.
What size dish should I use? A standard 9×9 inch square baking dish works perfectly for 12 generous squares. You can also use a similarly sized rectangular dish.
Conclusion
This Lighter Eggnog Tiramisu is everything a holiday dessert should be — festive, flavorful, effortless, and completely crowd-pleasing. It brings the warmth of eggnog spice together with the classic sophistication of tiramisu in one beautiful, no-bake package that you can prepare well in advance.
Whether you are serving it at a Christmas dinner, a New Year’s Eve celebration, or simply enjoying a cozy night in, this recipe delivers big on flavor without the heavy calorie count. It is the kind of dessert that earns recipe requests, starts conversations, and has everyone reaching for a second slice.
Add this Lighter Eggnog Tiramisu to your holiday dessert rotation this year — your guests will thank you for it.
🍽️ Discover Your Next Favorite Recipe
Welcome to your personalized recipe discovery hub! Whether you’re craving a quick weeknight dinner, a show-stopping dessert, a refreshing cocktail, or a healthy keto-friendly meal, we’ve organized hundreds of delicious recipes from Relish The Recipe into easy-to-browse categories. Simply click on any recipe title below to jump straight to the full instructions, ingredient lists, pro tips, and mouthwatering photos. Bookmark this section or share it with friends who love exploring new flavors. Happy cooking, and even happier eating!
🌱 Vegan & Vegetarian Delights
Plant-powered meals that never compromise on flavor. From comforting soups to bold Asian-inspired bowls, these recipes prove vegan cooking is vibrant, satisfying, and endlessly creative.
🍗 Juicy Chicken Recipes
From Vietnamese lemongrass infusions to creamy one-pan wonders, these chicken recipes deliver maximum flavor with minimal fuss. Perfect for busy weeknights or weekend entertaining.
- 🌿 Vietnamese Lemongrass Chicken
- 🍝 Creamy Chicken Meatball Orzo
- 🍗 Crispy Garlic Parmesan Wings
- 🍯 Honey Balsamic Pomegranate Glazed Chicken
- 🍄 Mushroom Stuffed Chicken Breast
- 🍅 One-Pan Tuscan Orzo with Chicken
- 🌶️ Creamy Peri-Peri Chicken Pasta
- 🧅 Baked French Onion Chicken
- 🧄 Garlic Parmesan Chicken Thighs
- 🇯🇲 Jamaican Jerk Chicken Plantain Skillet
- 🥗 Low-Carb Tuscan Chicken Bake
- ⏱️ 15-Minute Keto Creamy Garlic Chicken
- 🌿 Zesty Herb Marinated Grilled Chicken Thighs
🍸 Signature Cocktails
Elevate your home bar with these expertly crafted cocktail recipes. From timeless classics like the Old Fashioned to tropical showstoppers like the Passion Fruit Martini, every sip is an experience.
- 🥃 Classic Whiskey Sour
- 🏴☠️ 10 Best Rum Cocktails
- 🍒 Vodka Cranberry Cocktail
- 🍎 Hot Apple Whisky Lime
- 🍋 Easy Margarita
- 🍊 Paloma Tequila Cocktail
- 👼 Angel Face Cocktail
- 🌅 Mandarin Sunrise
- 🍊 Aperol Spritz
- 🥥 Homemade Piña Colada
- 🫚 Moscow Mule
- 🥃 Old Fashioned
- 🗽 Manhattan Cocktail
- 🍇 Pomegranate Gimlet
- 🌿 Southside Gin Cocktail
- ✈️ Paper Plane Cocktail
- 🌶️ Mango Chilli Margarita
- 🍓 Frozen Strawberry Margarita
- 🌿 Strawberry Basil Mule
- 🫐 Blueberry Vodka Lemonade (3 Ways)
- 🥥 Strawberry Coconut Margarita
- 🧜♀️ Mermaid Mimosa
- 🥭 Passion Fruit Martini
- 🌺 Honolulu Highball
- 🤍 White Lady Cocktail
- 🍫 Almond Joy Cocktail
- 🍵 Green Tea Shot Cocktail
🍹 Refreshing Mocktails
All the flavor, none of the alcohol. These vibrant, family-friendly drinks are perfect for parties, pregnancy, sober-curious moments, or simply when you want something deliciously hydrating.
🥑 Keto & Low-Carb Favorites
Stay on track without sacrificing taste. These keto-approved recipes feature cloud bread, sugar-free desserts, zoodle alfredo, and hearty mains that keep carbs low and satisfaction high.
- 🥩 Keto Schnitzel
- 🍰 Keto German Chocolate Cake
- 🥜 Keto Yogurt Almond Cake
- 🥓 Keto Beef Roulades
- ☁️ Fluffy Keto Cloud Bread
- 🍦 Low-Carb Cottage Cheese Ice Cream
- 🧁 Keto Muffins Recipe
- 🍔 3-Ingredient Carnivore Bun
- 🥬 Keto Spinach Feta Omelette
- 🥓 Keto Bacon Cheeseburger Casserole
- 🍆 Keto Eggplant Parmesan
- 🍝 One-Pot Zoodle Alfredo
- 🥖 Keto Garlic Herb Breadsticks
- 🍌 Keto Chocolate Chip Banana Bread
- 🌮 Keto Low-Carb Tortillas
🍰 Decadent Desserts
Life is short—eat the cake! From no-bake cheesecakes to molten lava cakes and Valentine’s heart cookies, these sweet endings are worth every calorie. Pro tip: double the recipe.
- 🌀 Protein Powder Cinnamon Rolls
- 🫐 Blueberry Tiramisu
- ❤️ Red Velvet Valentine Cookies
- 💝 Valentine Heart Cookies
- 🎂 Ombre Heart Buttercream Cake
- 🧁 Homemade Valentine Mini Cakes
- 🍫 Molten Mini Chocolate Lava Cakes
- 🍪 Thin & Chewy Chocolate Chip Cookies
- 🍪 No-Bake Oreo Delight
- 🥜 No-Bake Pistachio Cheesecake
- ✨ Mirror Glaze Raspberry Mousse Cake
- 🍫 Cream Cookie Chunk Fudge
- 🍌 No-Bake Banana Pudding
- 🥥 Samoa Brownies
- 🌙 Kunafa Tiramisu Fusion
🍲 Soups & Comfort Classics
Warm your soul with these hearty, homemade soups and comforting one-pot wonders. Perfect for chilly evenings, meal prep, or when you need a culinary hug.
🥗 More Delicious Categories
Explore beef, pork, seafood, pasta, breakfast ideas, appetizers, and healthy baking—all curated for maximum flavor and minimal stress. Your next kitchen adventure awaits!
✨ Pro Tip: Love a recipe? Save it to your favorites, share it with a friend, or tag us on social media! Every click helps us create more delicious content just for you. Happy cooking from the Relish The Recipe family! 🍴💛


Если вы продвигаете сайт и ищете понятные материалы, можно почитать SEO-блог с пошаговыми инструкциями — там есть разборов по выбору ниши, контенту и продвижению.