It’s a rare roast that inspires the same amount of devotion as a beautifully cooked prime rib. The flavor, texture, and sheer presence of this roast make it the ideal centerpiece for any special meal or even a great way to treat yourself on a weekend night. But with just a few helpful tips, cooking a bone-in prime rib roast on a pellet grill is not only easier than you might think, it’s also a huge crowd-pleaser, giving you the advantages of indirect heat and steady temperatures along with a nice hint of smoke. We’ll show you how.
The Cut: Choosing Your Primal Roast
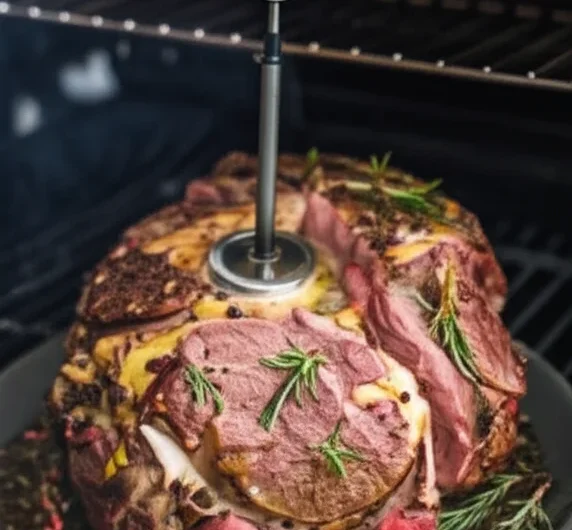
Today’s featured star is a bone-in prime rib, or, as many like to call it, a primal ribeye cut. The term “prime rib” may lead one to believe it’s USDA Prime graded, but even a “choice” grade primal ribeye, when done with attention and care, can be spectacular. We have a four-bone prime rib for this recipe, which is a perfect, manageable cut for a French-style cut.
To get that fancy French-style presentation of the bones scraped clean and exposed, just scrape down the bones, removing excess meat and connective tissue. Be careful, but don’t stress about being too precise. Whatever’s left will just char up as it cooks. Scrap meat can be saved for other purposes, like venison snack sticks.
Mastering Bone-In Prime Rib on a Pellet Grill: Your Guide to Backyard Barbecue Perfection
Course: DinnerCuisine: AmericanDifficulty: Medium4
servings2
hours16
minutes1
hour600
kcalThe Cut: Choosing Your Primal Roast
Today’s featured star is a bone-in prime rib, or, as many like to call it, a primal ribeye cut. The term “prime rib” may lead one to believe it’s USDA Prime graded, but even a “choice” grade primal ribeye, when done with attention and care, can be spectacular. We have a four-bone prime rib for this recipe, which is a perfect, manageable cut for a French-style cut.
To get that fancy French-style presentation of the bones scraped clean and exposed, just scrape down the bones, removing excess meat and connective tissue. Be careful, but don’t stress about being too precise. Whatever’s left will just char up as it cooks. Scrap meat can be saved for other purposes, like venison snack sticks.
Preprating Your Prime Rib
- Trussing:
Trussing is crucial for even cooking and maintaining the prime rib’s shape.
Use a generous length of butcher twine, cutting more than you anticipate needing to avoid breakage.
Tie a secure knot by wrapping the string around three times and pulling it very tight.
Finish with two granny knots on top and snip any excess twine.
- Salt Brining:
Salt brining is highly recommended for large cuts like prime rib.
Liberally coat all surfaces of the prime rib with kosher or sea salt; don’t be shy, as it’s a large cut.
Place the salted prime rib, uncovered, in the refrigerator.
The salt will penetrate and flavor the meat from the inside out, not just create a salty crust.
- Pre-Smoke Preparation
Rest Before Smoking: Let the seasoned prime rib sit at room temperature for about an hour before putting it in the smoker.
Bring to Room Temperature: Two hours before cooking, take the prime rib out of the fridge.
Apply Olive Oil: Lightly coat all sides of the prime rib with olive oil. This helps the rub stick evenly.
- Season with Rub:
For this recipe, PS Seasoning’s Prime Time rub was used, known for its buttery, garlic, and black pepper notes that perfectly complement prime rib.
If you don’t have Prime Time, use any beef-friendly rub that marries well with the meat’s flavor.
The Pellet Grill Cook: Low and Slow for Wall-to-Wall Pink
- Today, we’re using a Traeger Timberline, but any pellet grill will do. If you don’t have a smoker, you can adapt this to an oven, but you’ll miss out on that beautiful smoke flavor.
- Preheat the Pellet Grill: Set your pellet grill to 225°F (107°C). Cooking at a lower temperature is crucial for prime rib as it helps achieve that desirable wall-to-wall pink internal doneness without creating a thick gray band on the edges.
- Position the Roast: Place the prime rib on the grill, orienting the thickest cut towards the hottest part of your pit (on the Timberline, this is typically the right side). If you plan to make a homemade au jus, place a pan directly underneath the wire rack to collect the delicious drippings. These drippings, combined with the fond (browned bits) scraped from the pan after cooking, form an excellent base for a rich au jus.
- Probe and Rotate: Insert a reliable temperature probe into the thickest part of the prime rib, ensuring it hits the absolute center. For an accurate reading, pull the probe back a tad after hitting the center, as the outer edges will be about 5°F warmer.
- Here’s the number one tip for even cooking: Rotate your prime rib 90 degrees every 30 minutes during the cook. If one side is cooking faster, you might even rotate it 180 degrees. This constant rotation helps ensure a uniform temperature across the entire roast. As a general guide for beginners, plan for about 30 minutes per pound for the initial cook.
- The Garlic Butter Paste: Once the prime rib reaches an internal temperature of 80°F (27°C), you can optionally wrap the exposed bones with foil to prevent excessive charring. At this stage, begin preparing your simple yet incredibly flavorful garlic butter sauce. In a saucepan, melt two sticks of unsalted butter with a couple of heaping tablespoons of minced garlic and about two tablespoons each of chopped fresh rosemary and thyme. These herbs are a match made in heaven with prime rib.
- Once the prime rib hits an internal temperature of 90°F (32°C), start drizzling this deliciousness over the roast. Drizzle it gently at first to avoid disturbing the setting seasoning. Continue to add the sauce periodically until it’s all used up or the cook is complete. Be careful not to spill butter directly into the fire pot, as it could cause a grease fire.