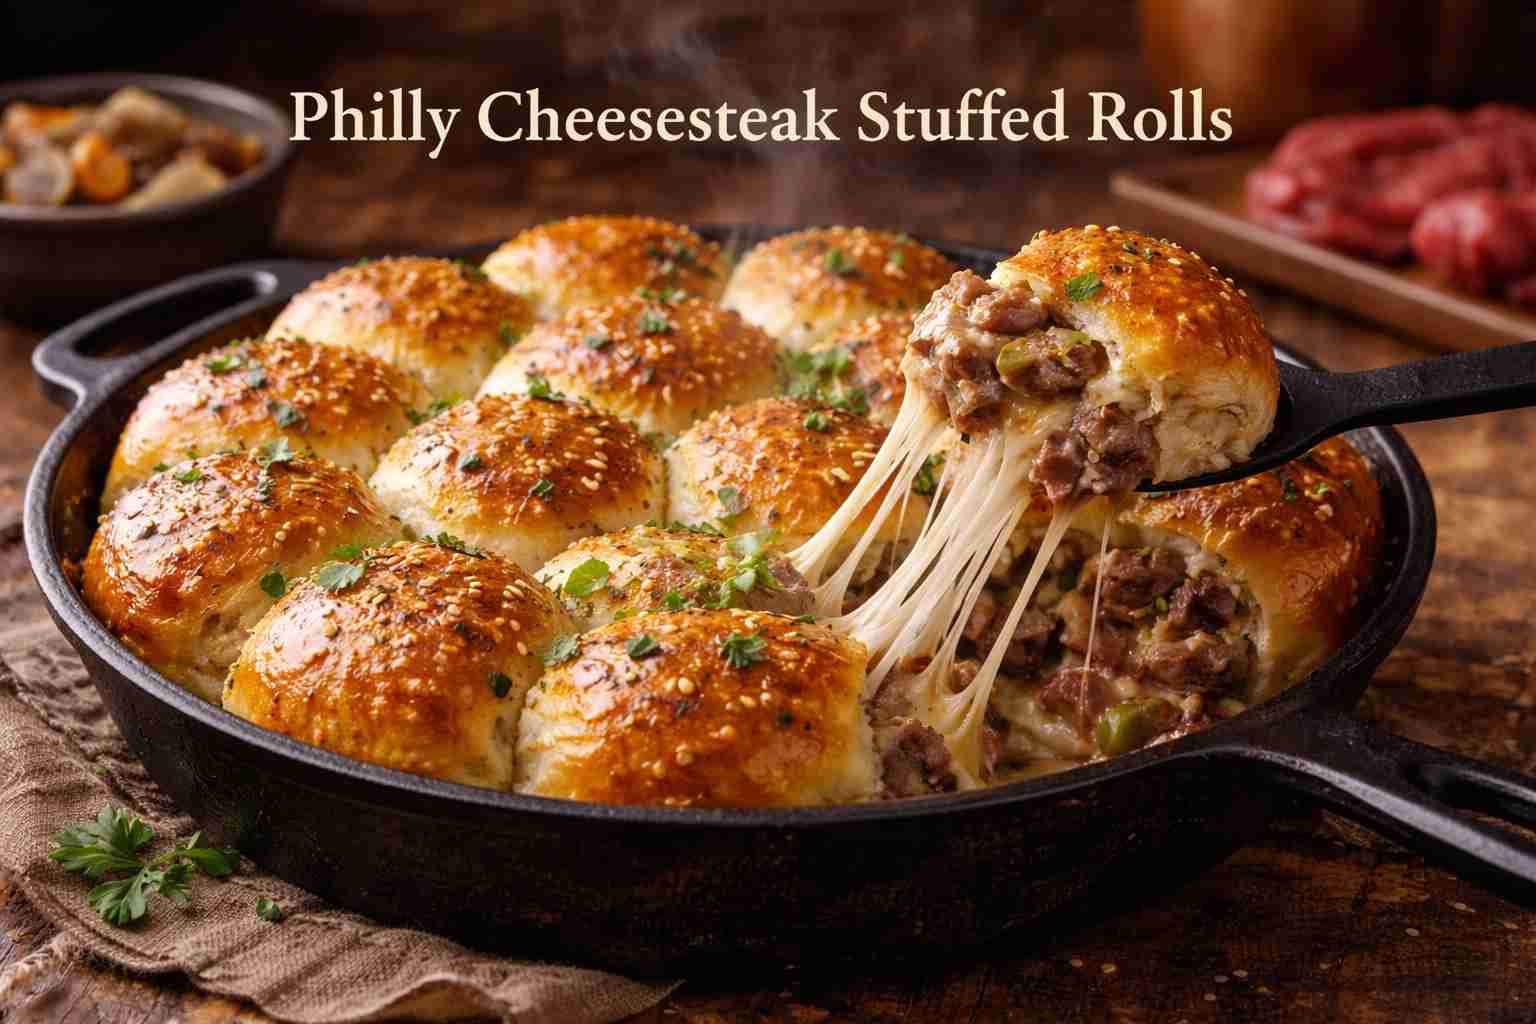
There are certain food combinations so fundamentally right, so perfectly balanced in their ratio of savory to rich to satisfying, that they have earned the status of genuine American culinary icons. The Philadelphia Cheesesteak is one of these combinations — thinly shaved ribeye, sautéed onions and peppers, and melted provolone on a soft roll, assembled and consumed in a format that is simultaneously humble and spectacular. It is one of the most beloved sandwiches in the country, and it has been since Pat Olivieri first assembled it on a street cart in Philadelphia sometime in the 1930s. The flavors are irreproducible, the format is iconic, and the experience of eating one — ideally leaning forward over the counter in what Philadelphians call “the Philly lean” to avoid the dripping grease — is the kind of eating memory that stays with you for a long time.
What these Philly Cheesesteak Stuffed Rolls accomplish is something genuinely clever: they take every element of that iconic flavor profile — the ribeye, the sautéed vegetables, the molten provolone — and repackage it inside soft, pull-apart dinner roll dough, brushed with a garlic herb butter and baked until golden in a cast-iron skillet. The result is a self-contained, handheld, party-ready version of the cheesesteak that retains everything that makes the original great — the tender beef, the sweet peppers and onions, the stretchy melted cheese — while adding the warmth and golden crunch of a freshly baked roll. It is a brilliant format for entertaining, for game day spreads, for weeknight dinners where you want something genuinely exciting on the table without spending your evening over a hot stove. Every bite releases a burst of steam-filled, cheese-wrapped beef that is, in the simplest possible terms, irresistible.
Whether you are a lifelong cheesesteak devotee looking for a new way to honor the classic, or a home cook simply in search of a crowd-pleasing appetizer that will generate genuine excitement the moment it arrives from the kitchen, this recipe will earn an immediate and permanent place in your repertoire.
Recipe Overview
| Detail | Info |
|---|---|
| Cuisine | American (Philadelphia-Inspired) |
| Course | Appetizer / Main Course |
| Difficulty | Easy to Medium |
| Servings | 6–8 Rolls |
| Prep Time | 15 Minutes |
| Cook Time | 25 Minutes |
| Calories per Serving | Approx. 310 kcal per roll |
Ingredients
The Filling:
- ½ lb ribeye steak, thinly sliced (see technique note below)
- 1 large onion, sliced
- 2 bell peppers (red and yellow for color and sweetness), sliced
- 2 cloves garlic, minced
- 3 tbsp olive oil
- Salt and freshly ground black pepper, to taste
The Dough and Cheese:
- 2 cans refrigerated dinner roll dough (or 1 pack of frozen yeast rolls, fully thawed and lightly proofed)
- ½ lb provolone cheese, shredded or sliced (Provolone Dolce preferred)
The Garlic Herb Butter Topping:
- 3 tbsp unsalted butter, melted
- 1 tsp fresh flat-leaf parsley, finely chopped
- ½ tsp garlic powder
Optional but Recommended:
- Warm cheese sauce or jalapeño cheese dip, for serving
Step-by-Step Instructions

Step 1 — Slice the Ribeye
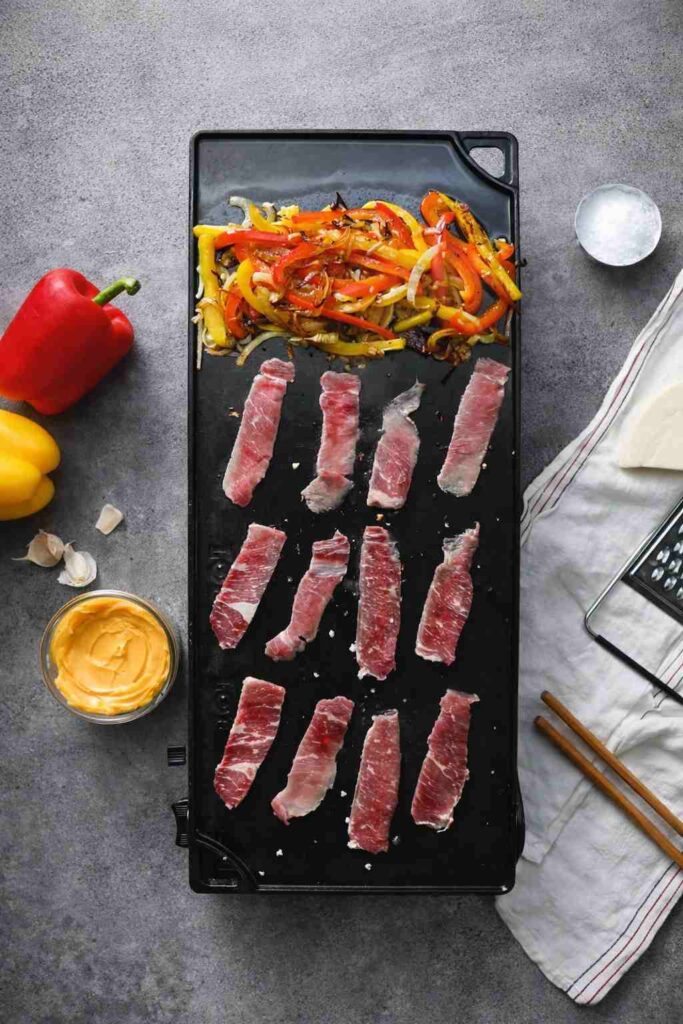
Before any heat is applied to anything, address the ribeye. The quality of the meat preparation is the single most important variable in the success of this recipe, and the key word is “thin.” A properly prepared cheesesteak filling requires beef sliced so thin it is almost translucent — what butchers call “shaved” beef. If you are slicing at home, the most reliable technique is to place the ribeye in the freezer for 30 to 45 minutes before cutting. At this partially frozen state, the meat’s structure is firm enough to hold its shape under the knife without compressing or tearing, allowing you to cut clean, paper-thin slices against the grain of the muscle fibers. Slicing against the grain is essential: it shortens the muscle fiber strands that, when left long, make the beef chewy and resistant regardless of how well it is cooked. Ribeye is the correct cut for this recipe because its high intramuscular fat content — the visible marbling that makes ribeye the gold standard for steakhouse cooking — provides continuous self-basting during the brief, high-heat cooking step, keeping the paper-thin slices tender and juicy rather than drying them out.
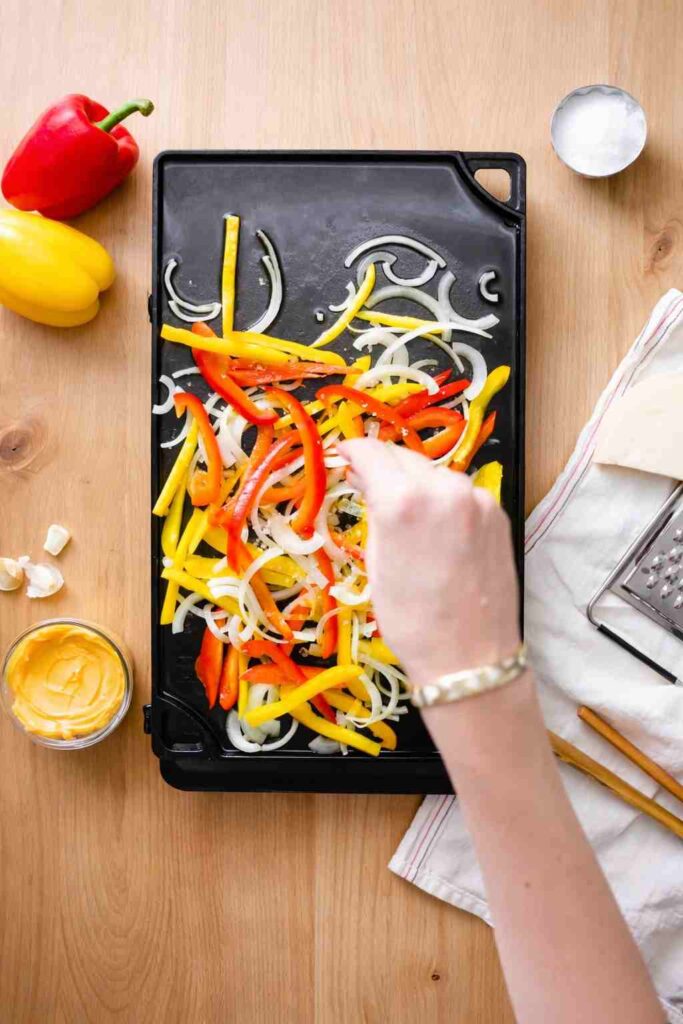
Step 2 — Sauté the Vegetables
Heat the olive oil in a large, wide skillet or on a flat griddle over medium-high heat until shimmering. Add the sliced onions and bell peppers simultaneously, season generously with salt and black pepper, and toss to coat in the oil. Cook over medium-high heat, stirring regularly, for approximately 6 to 8 minutes — your objective is vegetables that are softened, slightly golden at their edges, and fully tender while still retaining a very slight structural integrity rather than being completely collapsed and mushy. The distinction between “tender-crisp” and “overcooked and soggy” in sautéed peppers comes down to heat management: higher heat for a shorter period preserves some of the vegetable’s cellular structure while still fully cooking it; lower heat for longer will steam the vegetables in their own released moisture, producing a soft, waterlogged texture that makes for a wet, unappealing filling. During the last 60 to 90 seconds of vegetable cooking, push the vegetables to one side of the pan and add the minced garlic to the cleared, oil-coated space. Cook the garlic briefly, stirring constantly, until it is fragrant and just beginning to turn the palest gold at its edges. Garlic’s sugars burn at a lower temperature than most other aromatics, and the bitter, acrid flavor of scorched garlic is difficult to correct once present in the filling — adding it late protects against this risk entirely.
Step 3 — Cook the Ribeye
Push the vegetables to the outer edges of the pan, creating a clear hot zone in the center. Add the thinly sliced ribeye to this cleared center space, spreading the slices into as flat a layer as possible for maximum surface contact with the pan. Season lightly with salt and cook for 2 to 3 minutes, tossing and stirring once or twice to ensure even cooking on all surfaces. At the paper-thin thickness of properly sliced ribeye, this is all the cook time the beef requires — it will overcook and tighten if exposed to any more heat than this brief contact. Once the beef is browned on all surfaces and cooked through, mix it thoroughly with the sautéed vegetables, folding everything together into a unified filling with the beef and vegetables evenly distributed. Allow the filling to cool slightly — 5 minutes off heat — before assembly. An overly hot filling will begin cooking the dough from the inside during the assembly process, and it will also release more steam during baking than a slightly cooled filling, increasing the risk of a soggy interior.
Step 4 — Prepare the Dough
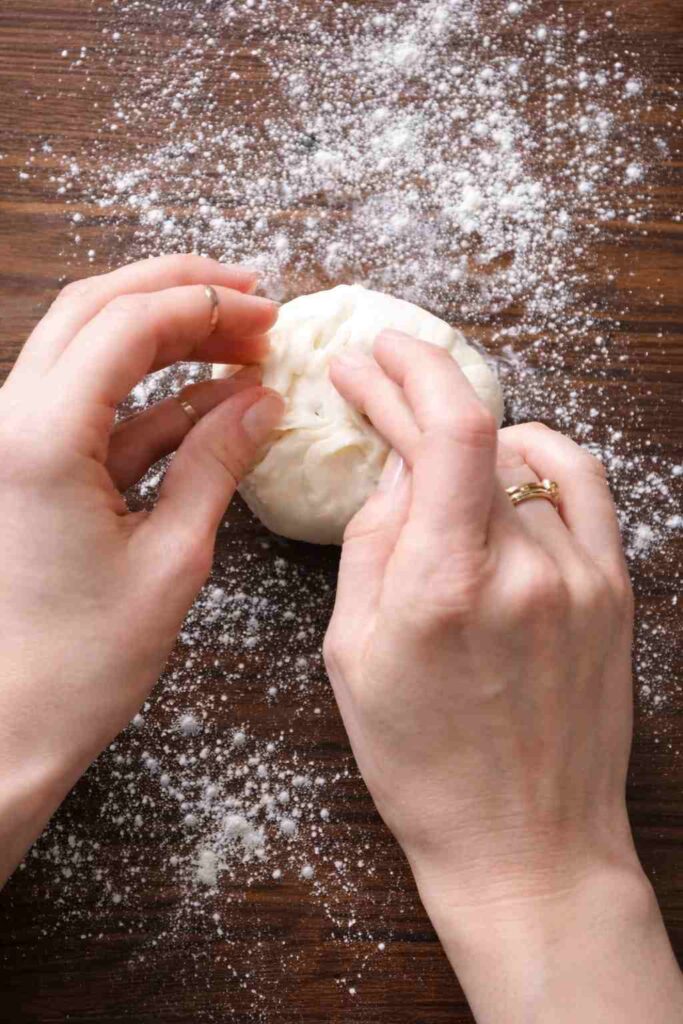
Lightly flour a clean work surface. Take each piece of dinner roll dough (approximately the size of a golf ball or small plum) and press it flat using your palm or a rolling pin, working outward from the center to create a round disc approximately 4 to 5 inches in diameter and uniformly thin across its surface. The dough should be thin enough to wrap completely around the filling but thick enough not to tear — approximately ¼ inch is the target thickness. If the dough springs back as you try to flatten it (a common behavior of refrigerated dough), allow it to rest at room temperature for 5 minutes before attempting to work it again — this relaxes the gluten network and allows the dough to stretch without resistance.
Step 5 — Assemble the Rolls
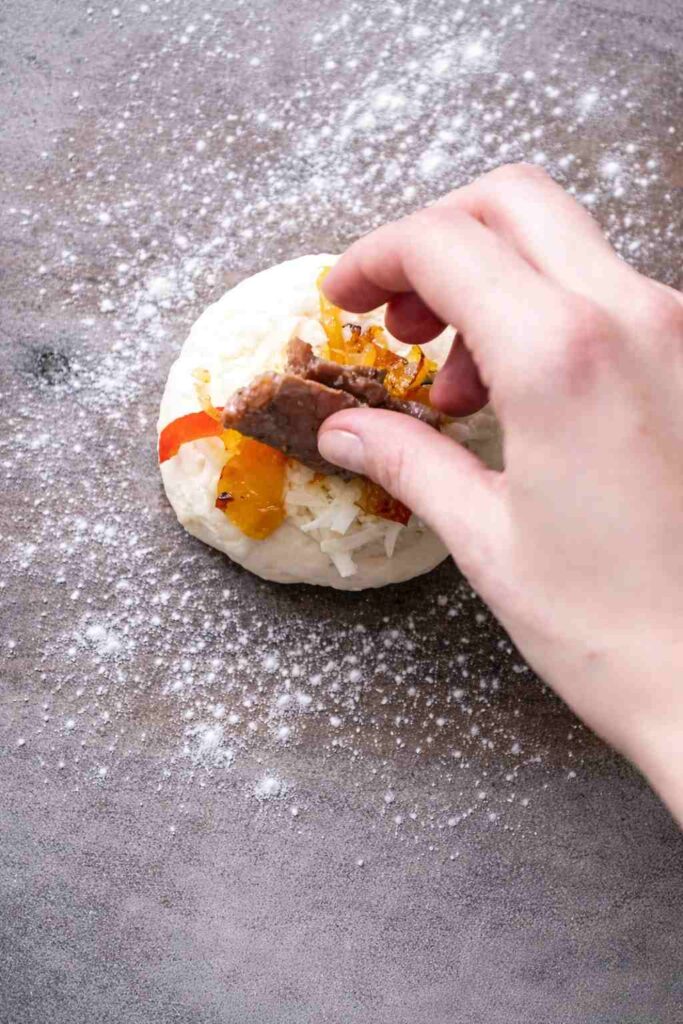
Working with one flattened dough disc at a time, layer the filling in the following order. First, place a small layer of shredded or thinly sliced provolone directly onto the center of the dough disc — this first cheese layer acts as a moisture barrier between the dough and the filling, preventing the meat juices from penetrating the raw dough and creating a soggy bottom. Second, add a generous spoonful (approximately 2 tablespoons) of the steak and vegetable filling on top of the cheese. Third, add a second pinch of provolone on top of the filling — this top cheese layer will melt during baking and create the stretchy, flowing molten cheese interior that makes the finished roll so satisfying to pull apart. Do not overfill: the temptation to pack each roll generously is understandable, but an overfilled roll cannot be properly sealed and will leak during baking, producing an open seam that allows the filling to escape and the dough around the opening to remain raw and doughy.
Step 6 — Seal and Arrange
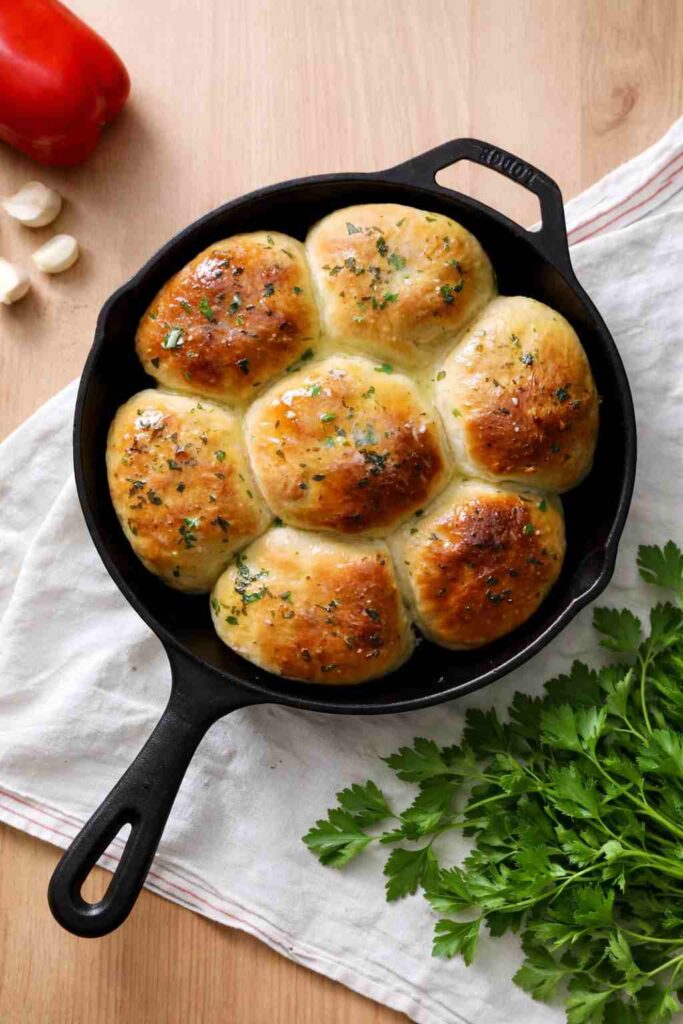
Gather the edges of the dough disc around the filling, pulling them upward and inward over the top of the filling like a drawstring purse. Pinch the gathered edges together firmly and repeatedly at the top, pressing the dough together with your fingertips to create a secure seal. Give the pinched seam an additional press to reinforce it, then place the roll seam-side down in a greased cast-iron skillet or baking dish. The seam-side-down placement is critical: gravity and the pressure of the surrounding rolls will keep the seam closed during baking far more reliably than the pinch seal alone. Arrange all the assembled rolls in the skillet in a snug pattern, sides touching or nearly touching — this contact between rolls during baking creates the “pull-apart” structure in the finished dish and also helps the rolls rise upward rather than spreading outward during baking.
Step 7 — Apply the Garlic Butter and Bake
Combine the melted unsalted butter, finely chopped fresh parsley, and garlic powder in a small bowl, stirring to incorporate. Using a pastry brush, apply approximately half of this garlic butter mixture over the tops and exposed sides of all the assembled rolls. This pre-bake butter application serves two functions: it provides fat to the dough surface that will enhance Maillard browning during baking, and it begins distributing the garlic and herb flavor into the dough surface before the oven heat can drive the volatile aromatics off. Preheat the oven to 375°F (190°C) — a temperature carefully chosen to develop golden browning of the dough within the 15-minute window before the cheese inside the rolls has had time to fully oil-separate (at which point the cheese loses its smooth, creamy melt and becomes grainy and greasy). Bake for 15 minutes, checking at the 12-minute mark. The rolls are correctly done when their tops are a deep, uniform golden brown and they feel firm but slightly springy when pressed gently.
Step 8 — Final Butter and Serve
The moment the rolls come out of the oven, while they are still steaming hot, brush the remaining garlic butter mixture generously over every surface. The residual heat of the rolls immediately melts and absorbs this second butter application, adding a fresh, bright garlic-herb flavor and a glossy sheen to the surface that the baked-in first coat alone could never provide. Allow the rolls to rest for 3 to 4 minutes before serving — just long enough for the interior cheese to stabilize slightly from its fully molten state and for the dough structure to set enough to hold its shape when pulled apart. Serve directly from the cast-iron skillet for maximum visual impact, accompanied by warm cheese sauce or a spicy horseradish mayo.
Philly Cheesesteak Stuffed Pull-Apart Rolls
Shaved ribeye, peppers & onions, provolone, and garlic-herb butter — baked into golden pull-apart rolls
- ½ lb ribeye steak, very thinly sliced
- 1 large onion, sliced
- 2 bell peppers (red + yellow), sliced
- 2 cloves garlic, minced
- 3 tbsp olive oil
- Salt + freshly ground black pepper, to taste
- 2 cans refrigerated dinner roll dough (or thawed yeast rolls)
- ½ lb provolone, shredded or sliced (Dolce preferred)
- 3 tbsp unsalted butter, melted
- 1 tsp fresh parsley, finely chopped
- ½ tsp garlic powder
- Warm cheese sauce or jalapeño cheese dip (serving)
Slice the Ribeye
Freeze ribeye 30–45 minutes, then shave paper-thin slices against the grain for tender bites.
Sauté the Vegetables
Heat oil in a large skillet. Cook onions + peppers 6–8 minutes until tender and lightly golden. Add garlic for the last 60–90 seconds.
Cook the Ribeye
Push veggies aside; sear shaved ribeye in the hot center 2–3 minutes. Mix with veggies and cool 5 minutes before assembling.
Prepare the Dough
Flatten each roll piece into a 4–5 inch disc (~¼ inch thick). If dough springs back, rest 5 minutes and try again.
Assemble the Rolls
Add provolone (moisture barrier), 2 tbsp filling, then a little more provolone. Avoid overfilling.
Seal & Arrange
Pinch closed like a drawstring and place seam-side down in a greased skillet or baking dish, snugly arranged for pull-apart style.
Garlic Butter & Bake
Mix melted butter + parsley + garlic powder. Brush half on rolls. Bake at 375°F (190°C) for ~15 minutes until deep golden (check at 12).
Final Butter & Serve
Brush remaining garlic butter right after baking. Rest 3–4 minutes, then serve with warm cheese sauce if desired.
Conclusion: The Pull, the Steam, and the Perfect Bite
The measure of a Philly Cheesesteak Stuffed Roll is taken in the moment of the pull — when two hands take hold of adjacent rolls and pull them gently apart, and the cheese stretches into long, golden strands between them, and the steam rises from the just-revealed interior in a fragrant cloud of beef, garlic, and caramelized onion. This is the sensory payoff that the entire recipe is designed to deliver, and when all the preparation steps have been executed correctly, it is delivered with reliable, reproducible precision every single time.
What makes this recipe stand up to repeated use is its intelligent layering of technique and convenience. The use of refrigerated or thawed frozen dinner roll dough removes the most technically demanding and time-consuming element of scratch bread-making while preserving the essential quality of a freshly baked, yeast-leavened roll with a soft, pillowy interior and a properly golden crust. The double application of garlic butter — once before baking and once immediately after — is a technique borrowed from professional bakery production and produces a result that no single-application approach can match in terms of color, flavor freshness, and surface sheen. And the cast-iron skillet’s heat-retention and base-conduction properties provide the slight, golden crust on the roll’s underside that differentiates a properly made stuffed roll from a merely baked one.
At approximately 310 calories per roll, these deliver a genuinely complete combination of protein, fat, and carbohydrate in a compact, impressive, share-worthy package. They reheat beautifully in an air fryer at 350°F for 5 minutes. They assemble in 15 minutes. And they produce, without exception, the particular kind of spontaneous, table-side delight — the audible appreciation, the immediate reach for seconds — that every home cook lives for.
Common FAQs about Philly Cheesesteak Stuffed Rolls Recipe
Why is ribeye the universally accepted standard for an authentic cheesesteak and what specific qualities make it irreplaceable?
Ribeye is cut from the longissimus dorsi muscle along the upper ribcage — one of the least-exercised muscles in the animal, which means it develops minimal connective tissue and maximum intramuscular fat (marbling). This fat-to-lean ratio produces three qualities essential to a great cheesesteak filling: extreme tenderness (little connective tissue to resist chewing), rich, beefy flavor (fat carries far more flavor compounds than lean muscle), and self-basting juiciness during cooking (as the intramuscular fat renders at medium-high heat, it coats and protects the lean muscle proteins from drying out even at paper-thin slices). No cheaper cut — regardless of how thinly sliced — can replicate these three qualities simultaneously.
Why does Cheez Whiz remain the authentic Philadelphia choice and what emulsification chemistry makes it so differently behaved than natural cheese?
Cheez Whiz is a processed cheese product containing natural cheese, water, milk proteins, and emulsifying salts — typically sodium phosphate and sodium citrate. These emulsifying salts disrupt the calcium bridges between casein micelles in the cheese’s protein network, converting the protein structure from a continuous gel (which melts by flowing) into discrete protein particles suspended in a stabilized fat-water emulsion. This processed emulsion cannot break or oil-separate regardless of temperature — it simply remains a smooth, fluid, creamy consistency across a wide temperature range. For a cheesesteak eaten immediately while hot, Cheez Whiz provides a continuous, saucy coating on the beef that natural cheese melts cannot replicate, and its higher salt content (from the emulsifying salts) provides an intensely savory flavor that is itself part of the authentic Philly experience.
What is the specific Maillard reaction chemistry occurring on the dough surface during baking?
The dinner roll dough’s surface contains both proteins (from the flour’s gluten proteins and any added milk or egg) and reducing sugars (from the flour’s damaged starch and any added sugar in the formulation). At the oven’s 375°F temperature, the dough surface dries rapidly, and as its surface moisture drops below the threshold needed to maintain surface temperature at 212°F (boiling point of water), the surface temperature rises above the Maillard threshold of approximately 280°F (138°C). At this point, the surface proteins’ free amino acids react with the reducing sugars to produce melanoidins (brown pigments) and hundreds of aromatic flavor compounds — pyrazines, furans, and aldehydes — that collectively constitute the complex, nutty, “freshly baked bread” flavor of the roll’s golden crust.
What is the food science explanation for why the rolls must be placed seam-side down and what failure mode results from placing them seam-side up?
The pinched seam of a stuffed roll is the weakest structural point of the dough enclosure — it is the region where two separate dough surfaces have been mechanically pressed together rather than forming an uninterrupted, continuous dough network. When placed seam-side up during baking, the expanding gases produced by the yeast within the dough (if present in the formulation) and the steam produced by the filling’s moisture both exert outward pressure on the dough from inside. At the seam — the weakest point — this outward pressure preferentially ruptures the pinched closure, allowing the filling to escape through the top of the roll. Placed seam-side down, gravity keeps the seam compressed against the pan surface, and the dough’s own weight reinforces the pinched closure against the internal pressure generated during baking.
What makes red and yellow bell peppers superior to green bell peppers specifically for this filling from a flavor chemistry perspective?
Green bell peppers are harvested before they have fully ripened. At the green stage, they have a sharp, slightly bitter, “green” character derived from high concentrations of 2-methoxy-3-isobutylpyrazine — the same pyrazine compound responsible for the characteristic green, raw vegetable note in many unripe vegetables. Red and yellow bell peppers are the same plant allowed to ripen fully on the vine. During ripening, this pyrazine compound degrades, and the peppers’ fructose and glucose content increases from approximately 2g to 5g per 100g — a 150% increase in sugar content. Fully ripe peppers are therefore dramatically sweeter, milder, and more culinarily versatile than green peppers, contributing sweetness and color rather than the assertive, competing bitterness of the unripe green.
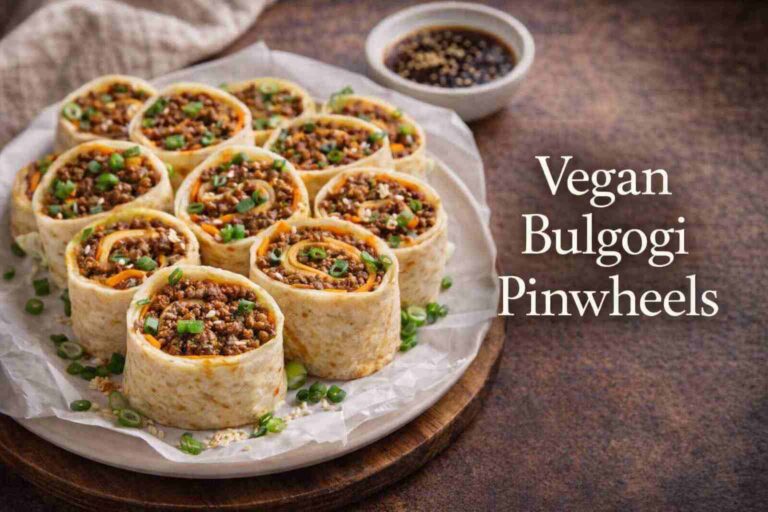
Explore our extensive collection of culinary delights that range from quick weeknight dinners to impressive entertaining dishes. Start your morning right with our five essential egg breakfast ideas, or try our chili crisp egg avocado toast for a modern twist. For those seeking healthier morning options, discover our healthy oatmeal apple banana cake, coconut cove baked oatmeal, and blueberry apple morning oats cake. Vegetarian breakfast enthusiasts will love our protein powder cinnamon rolls. For lunch, enjoy classics like the ultimate big mac salad, crispy potato tacos, quick ham and cheese pinwheels, and vegan bulgogi pinwheels. Our main course selection includes impressive options such as Vietnamese lemongrass chicken, honey balsamic pomegranate glazed chicken, mushroom stuffed chicken breast, and baked French onion chicken. Meat lovers should try our three Italian style meatloaves, pan seared pork tenderloin in creamy peppercorn gravy, and citrus glazed roasted pork ribs with creamy mushroom potatoes. For pasta and seafood, explore shrimp aglio e olio, New England creamy clam chowder, Manhattan clam chowder soup, red pesto gnocchi, brown butter and sage mezzi rigatoni, and creamy peri peri chicken pasta. Our soup collection features creamy broccoli and garlic soup, carnival squash soup with turmeric, split pea soup, ham bean soup, hearty vegetable barley soup, and creamy asparagus soup. Vegetarian options include vegan ramen, quick vegan lasagna, vegan cabbage rolls, spicy maple tofu rice bowl, and vegan chicken and dumpling soup. For sides, enjoy garlic butter cheese bombs, oven baked potatoes with meatballs and cheese, broccoli recipes that taste amazing, oven roasted crispy potato, honey butter cornbread, and one pan Tuscan orzo with chicken. Our appetizer selection includes the ultimate crispy buffalo chicken wonton cups, the ultimate buffalo chicken cauliflower dip, the ultimate buffalo chicken garlic bread, and garlic parmesan wings. Desserts range from blueberry tiramisu and heavenly molten mini chocolate lava cakes to thin and chewy chocolate chip cookies. For special occasions, try red velvet cookies, Valentine heart cookies, ombre heart buttercream cake, and homemade Valentine’s day mini cake delight. Keto dieters will appreciate our keto schnitzel, sugar free keto German chocolate cake, keto yogurt almond cake, keto beef roulades, fluffy keto cloud bread, keto muffins, Korean marinated eggs, and low carb cottage cheese ice cream. Additional healthy options include sugar free oat cakes, sugar free banana oat brownies, and low carb Tuscan chicken bake. For beverage enthusiasts, enjoy our cocktail collection including classic whiskey sour, hot apple whisky lime cocktail, easy margarita, Paloma tequila cocktail, vodka cranberry cocktail, Angel Face cocktail, Mandarin Sunrise cocktail, Aperol Spritz, homemade Piña Colada, virgin Piña Colada mocktail, Moscow Mule, Old Fashioned, Manhattan cocktail, Pomegranate Gimlet, Southside gin cocktail, Paper Plane cocktail, Mango Chilli Margarita, and our ten best rum cocktails. These carefully curated recipes offer something for every palate, occasion, and dietary preference.